

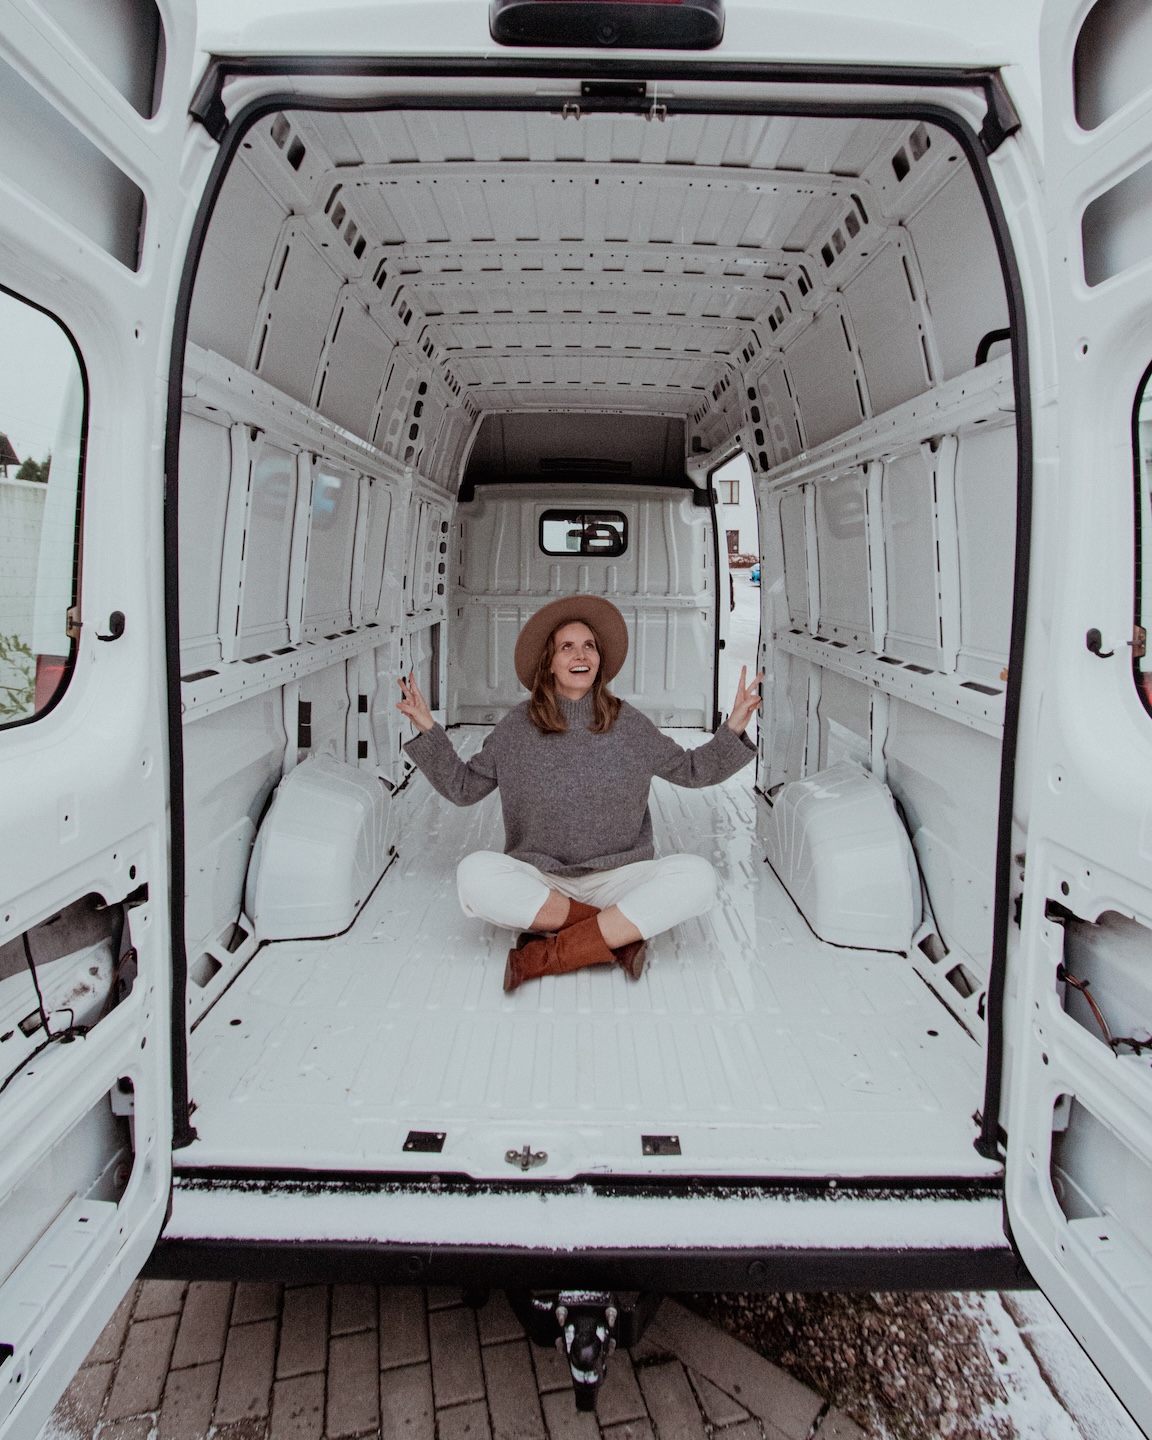
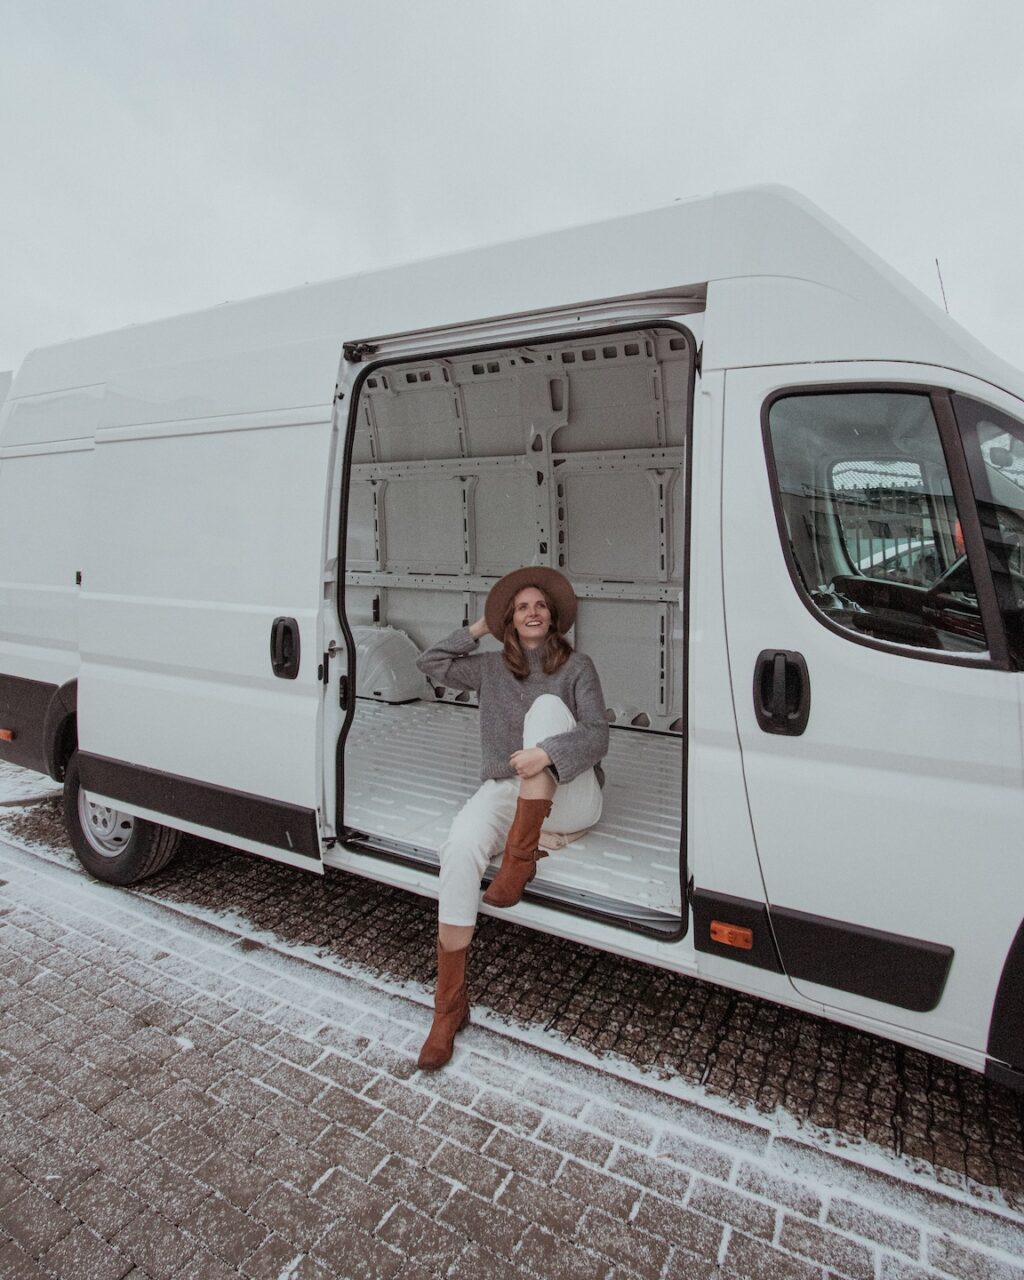
Thinking about building a campervan? I know how exciting and overwhelming it can feel.
Not that long ago, I was in exactly the same place, trying to figure out where to start, what really mattered, and how to turn an empty van into something that actually felt like us.
Now that my husband and I have finished our own build, I wanted to put everything we learned into one guide.
The good decisions, the mistakes, the things that took longer than expected, and all those little details I wish someone had told me earlier.
This is based entirely on our own experience, and I’ve organized it in the order that made the most sense for us, from the first ideas and planning stage to finally taking the van out on its first trip.
So make yourself a coffee, get comfortable, and let’s talk about how to turn a blank van into a space that feels like home.
Want to learn more about traveling by campervan?
On my Van Life Hub, you’ll find more articles on building a campervan, van travel, real costs of van life, and practical tips from routes across the U.S.
1. Plan Your Campervan Layout (Before You Build Anything)
Looking back, I’m really glad we spent weeks obsessing over our layout before buying a single screw. That early planning shaped everything that came later.
We started with rough sketches, saved way too many inspiration photos, and had a lot of long conversations about what we actually needed (not just what looked good on Pinterest).
At some point, we even made a small cardboard model and honestly… it helped so much. Space in a van is really tight, and seeing things in scale changes everything.
When planning your own layout, these are the things I’d really think through:
Bed size and placement
We went back and forth on this forever. Do you want the bed lengthwise or across the van? It sounds like a small detail, but it affects everything – comfort, storage, and how the whole space flows.
Bathroom situation
Do you actually want one? It’s amazing to have, especially on longer trips, but it takes up a lot of space and adds complexity you might not need.
How many people will travel with you
More people means more seats with seatbelts – and that usually means less living space. It’s one of those trade-offs you really feel later.
Kitchen priorities
Most vans have some kind of kitchen, often near the sliding door for airflow. But think about how much you’ll actually cook. Your version of a “kitchen” might be very different from someone else’s.
A place to sit (that isn’t your bed)
If you plan to work remotely or just want a comfortable place to slow down in the evening, this becomes more important than you think.
Storage (especially for bigger things)
If you’re bringing bikes, surfboards, or anything bulky, you’ll probably want a “garage” space under the bed. It’s one of those things you’re really grateful for later.
Weight matters more than you think
It’s not just about fitting everything in – your van has limits. In many places (like Europe), campervans are capped at 3.5 tons, so every decision adds up.
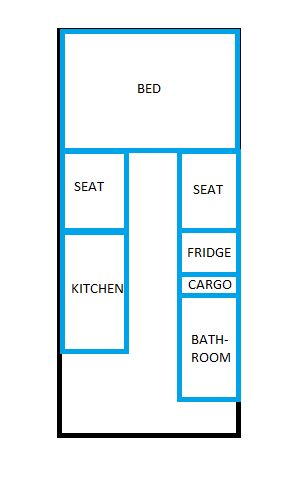
Our Campervan Layout (What We Chose and Why)
For our van, we ended up going with a pull-out bed measuring 180 × 200 cm (71 × 79 inches), running across the width of the van.
It wasn’t the easiest thing to build, but honestly, it was one of the best decisions we made. Having that much space to sleep makes such a difference, especially on longer trips.
We also managed to fit in a tiny bathroom (100 × 60 cm / 39 × 24 inches) with both a shower and a toilet. It’s compact, but it works – and having it on the road feels like a luxury more than a necessity.
Next to it, we built a small kitchen area (120 × 65 cm / 47 × …), which turned out to be just enough for what we needed day to day.
If you’re stuck on layout ideas, definitely check out my 10 Ingenious Van Build Layout Ideas You Need to See → I share some incredibly creative solutions that might spark your own design!
2. Choosing Your Van (The Decision That Shapes Everything)
After weeks of research and visiting dealerships, we finally had to make a decision. And honestly, this is one of the biggest ones you’ll make.
The van you choose will shape almost everything that comes next – from the layout and how much space you actually have, to the way it drives and how comfortable it feels on longer trips.

These were the vans we seriously considered:
The “Triplets”: Fiat Ducato, Peugeot Boxer, Citroën Jumper (Ram ProMaster in the US)
These three are basically the same van under different names. And honestly, we kept coming back to them for a reason.
They’re built on the same platform, which means parts and accessories are easy to find and interchangeable. But what really sold us was the width – you can fit a bed across the van, which is a game changer (especially if you’re tall).
They also come with different engine options, so you can adjust things depending on how and where you plan to travel.
And if you’re over 195 cm (6’5”), the high-roof version isn’t even a question – you’ll want it.
Ford Transit
The Transit comes in a lot of different versions – including longer bodies and even 4×4 options.
It’s a really good choice if you want a bit more flexibility, especially if you’re planning to go off-road or prefer something that feels a bit more modern.
Mercedes-Benz Sprinter & Volkswagen Crafter
These are great for bigger builds. They’re longer, a bit narrower, but give you more overall space to work with if you’re planning something more complex inside.
In the end, we chose the Peugeot Boxer.
It gave us the space we needed (which mattered a lot with a tall husband), and the 2.0L engine helped keep our road taxes lower. It just felt like the most practical balance for what we wanted.
3. Windows and External Modifications
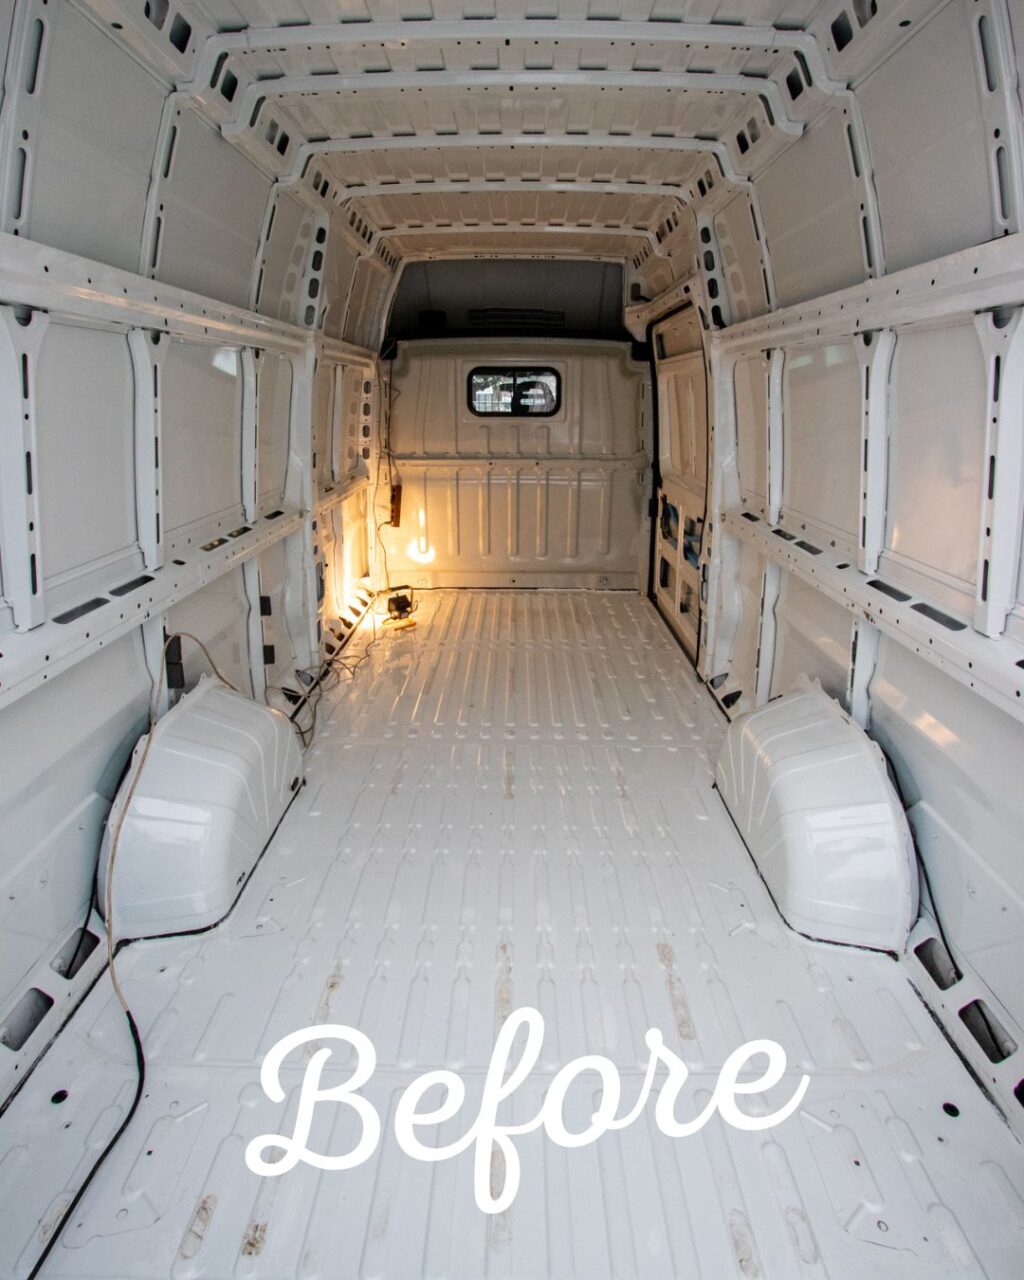
Once we had the van, the first real step was… cutting into it.
And I won’t lie – taking a saw to your van for the first time is terrifying. But adding natural light changes everything. It instantly makes the space feel more open, more livable, more like an actual home.
Here’s what we installed:
A side window
This made the biggest difference in how the van feels during the day. More light, more connection to the outside.
A roof fan (MaxxAir MaxxFan)
Essential. It helps with airflow, cooking, sleeping – everything. If you’re building a van, don’t skip this.
Two small rear windows (80 × 20 cm / 31 × 8 inches)
We added them behind the bed to create cross-ventilation, which makes a huge difference at night.
We also added a few external elements that make everyday life easier:
a water inlet connection, external charging sockets, a small bathroom vent, and a 4G + WiFi antenna on the roof.
If you’re planning to go solar (which I highly recommend), think about it early – before you finalize your roof layout.
The fan, panels, and antenna all compete for space, and it gets crowded faster than you’d expect.per grommet for the cables between your panels and the solar controller.
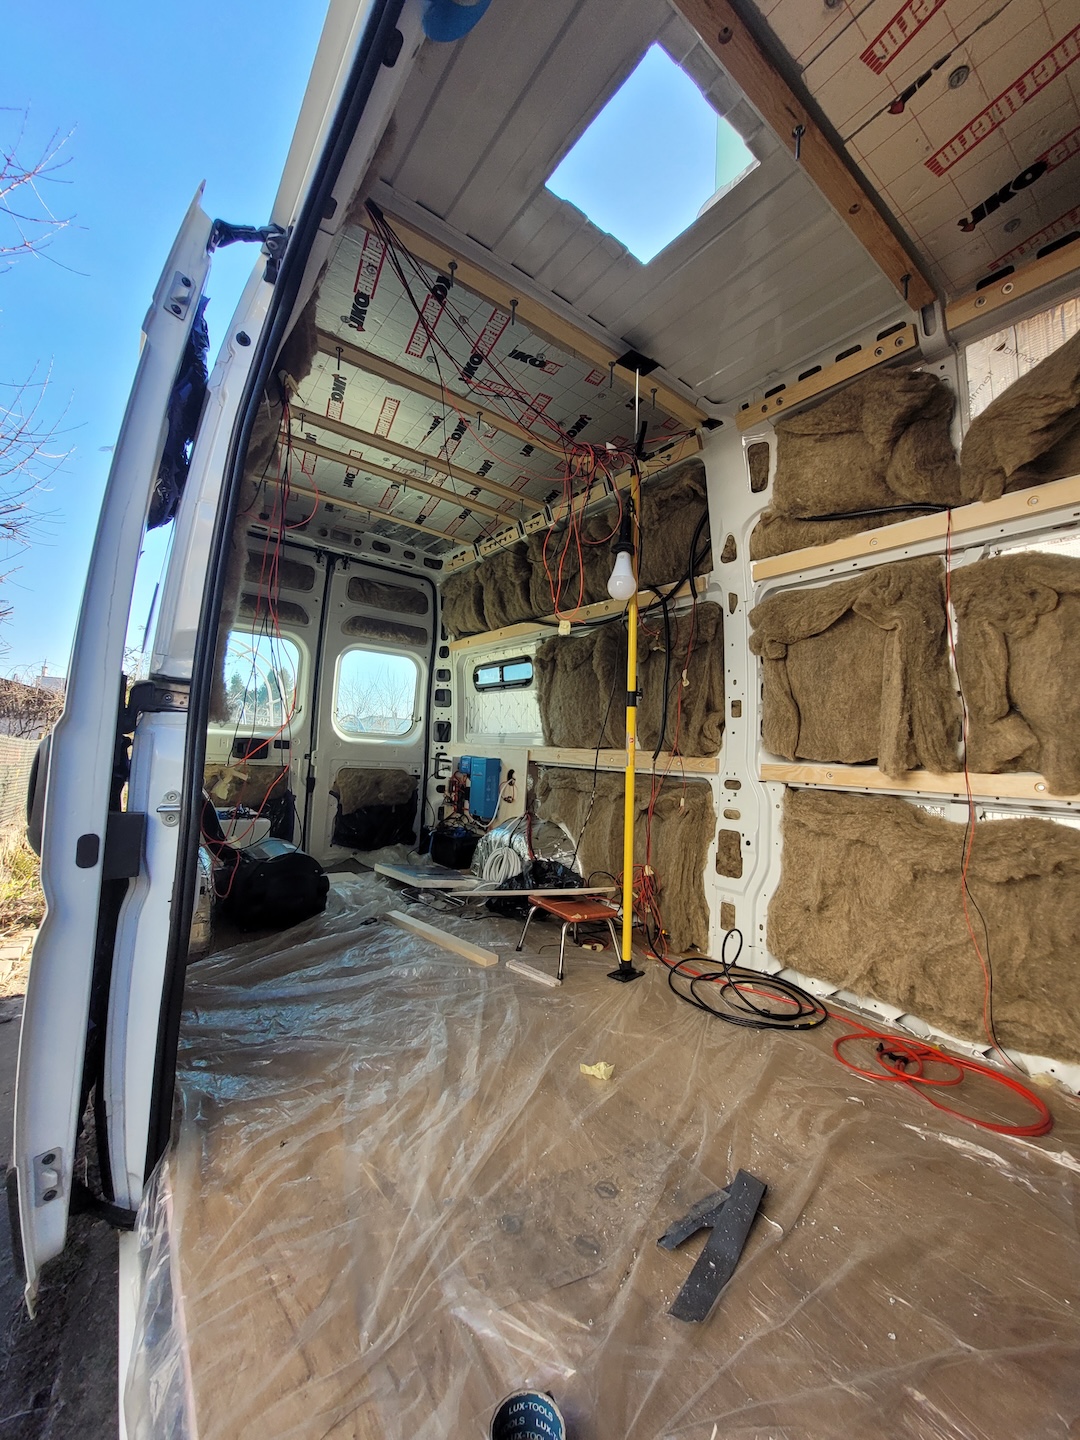
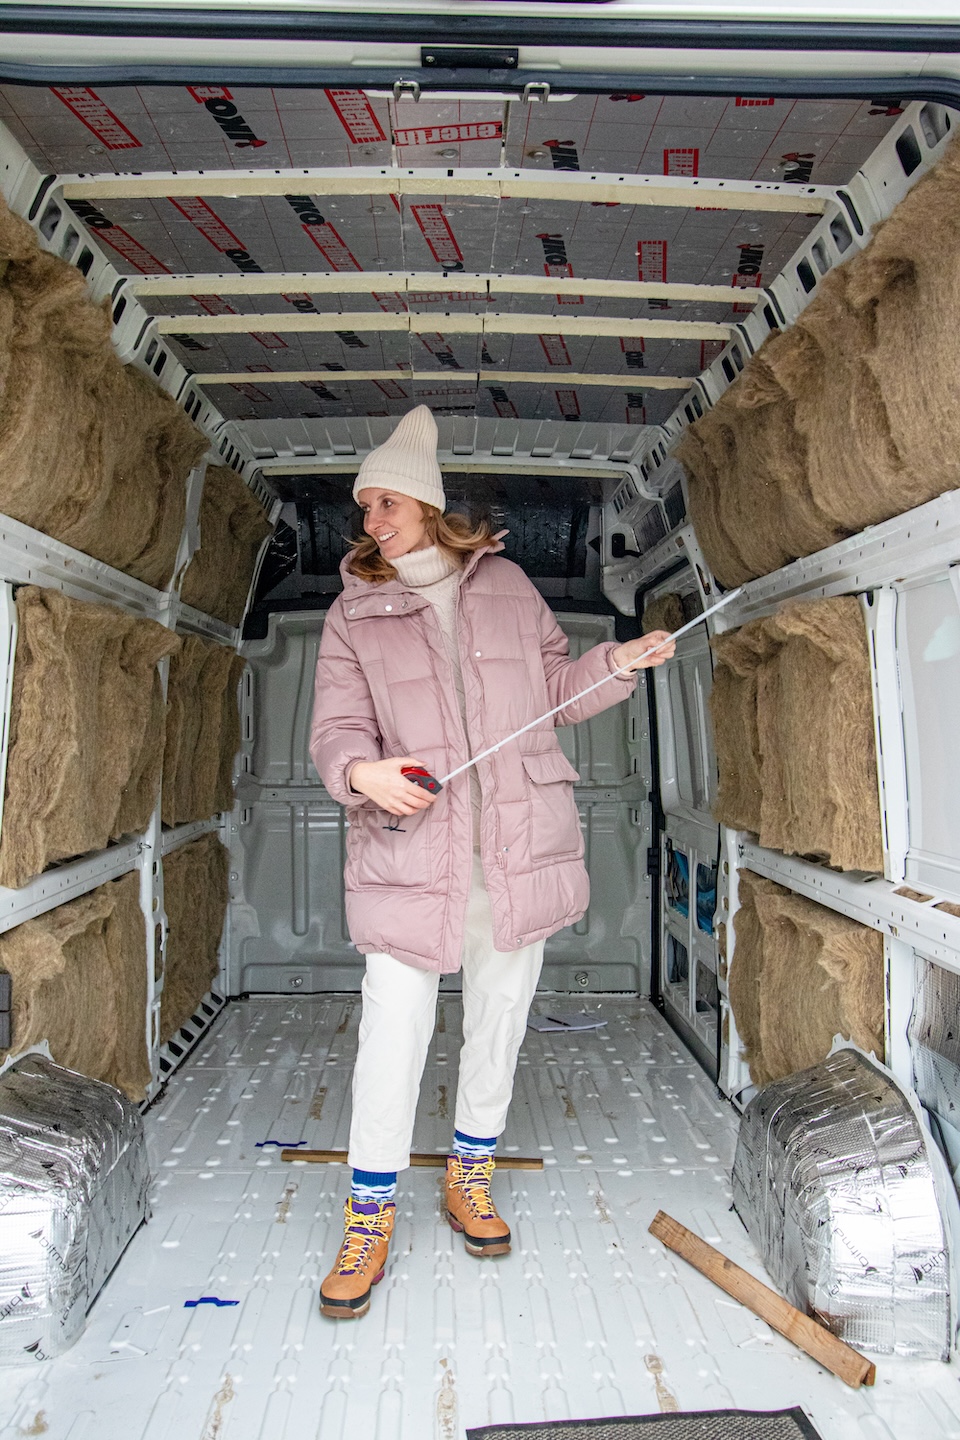
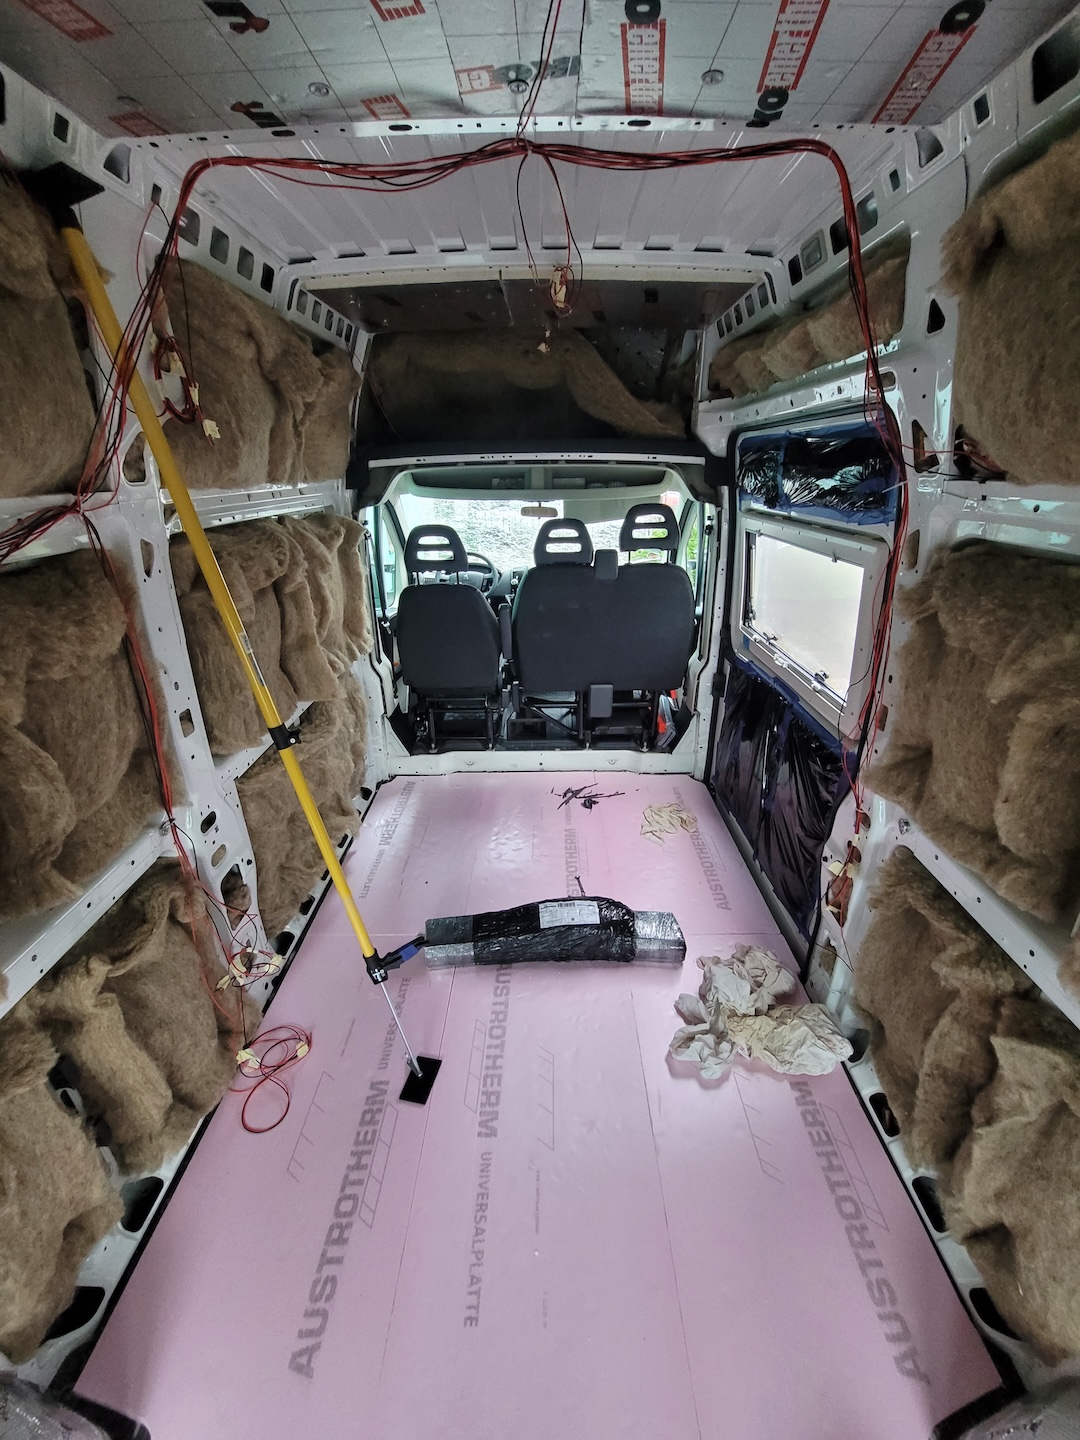
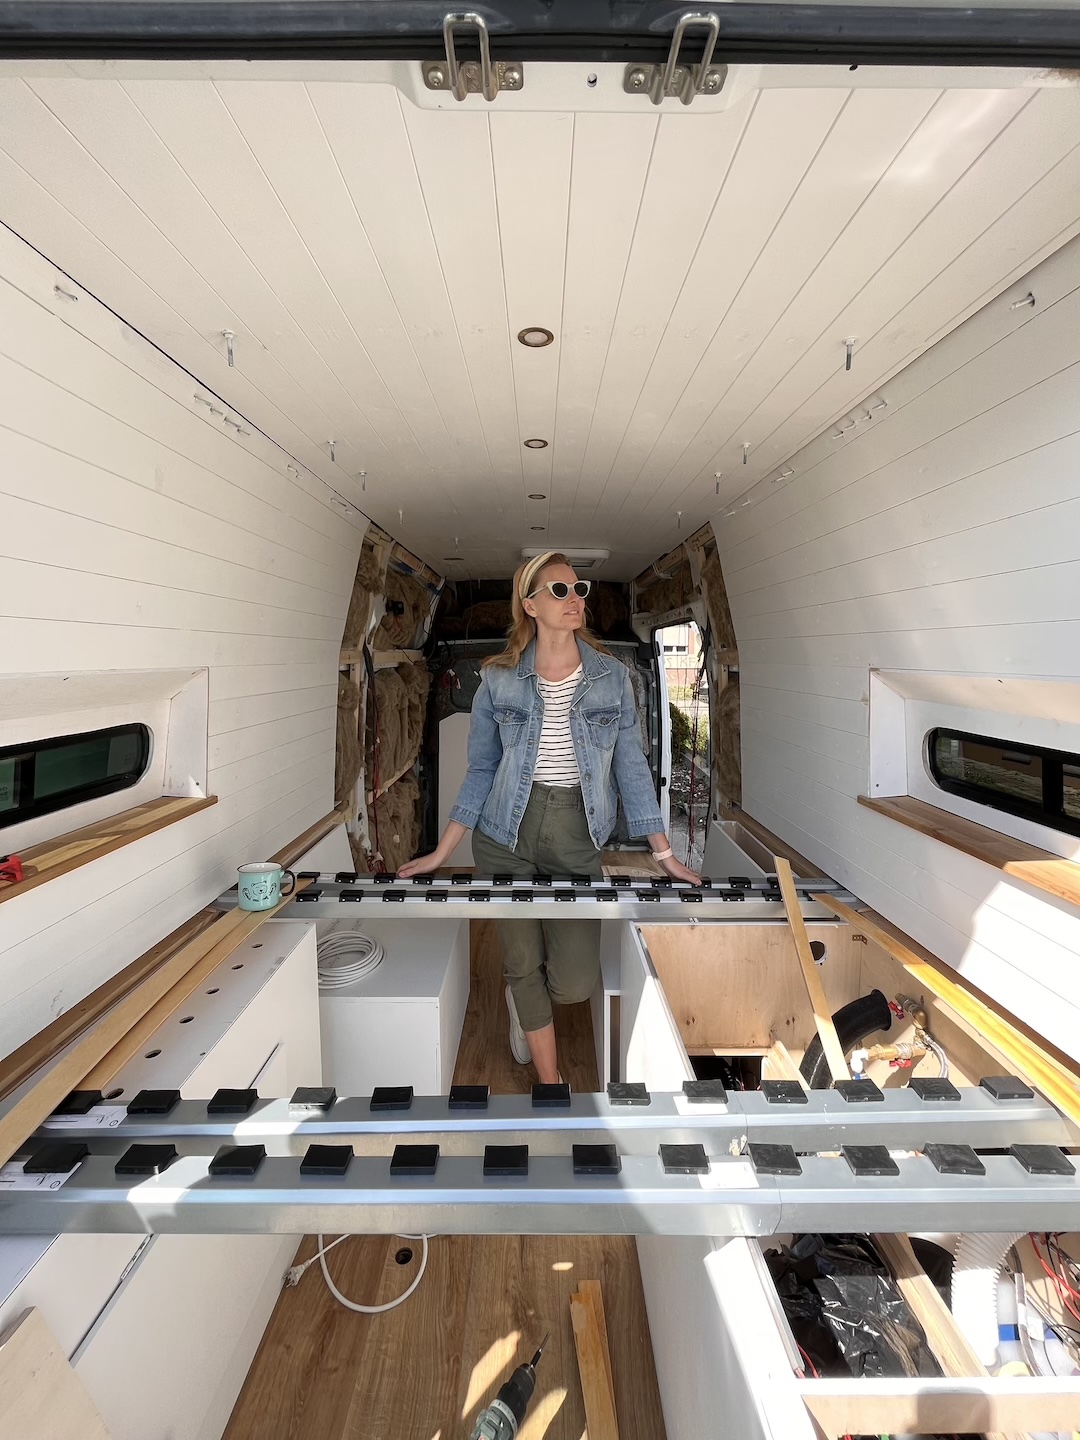
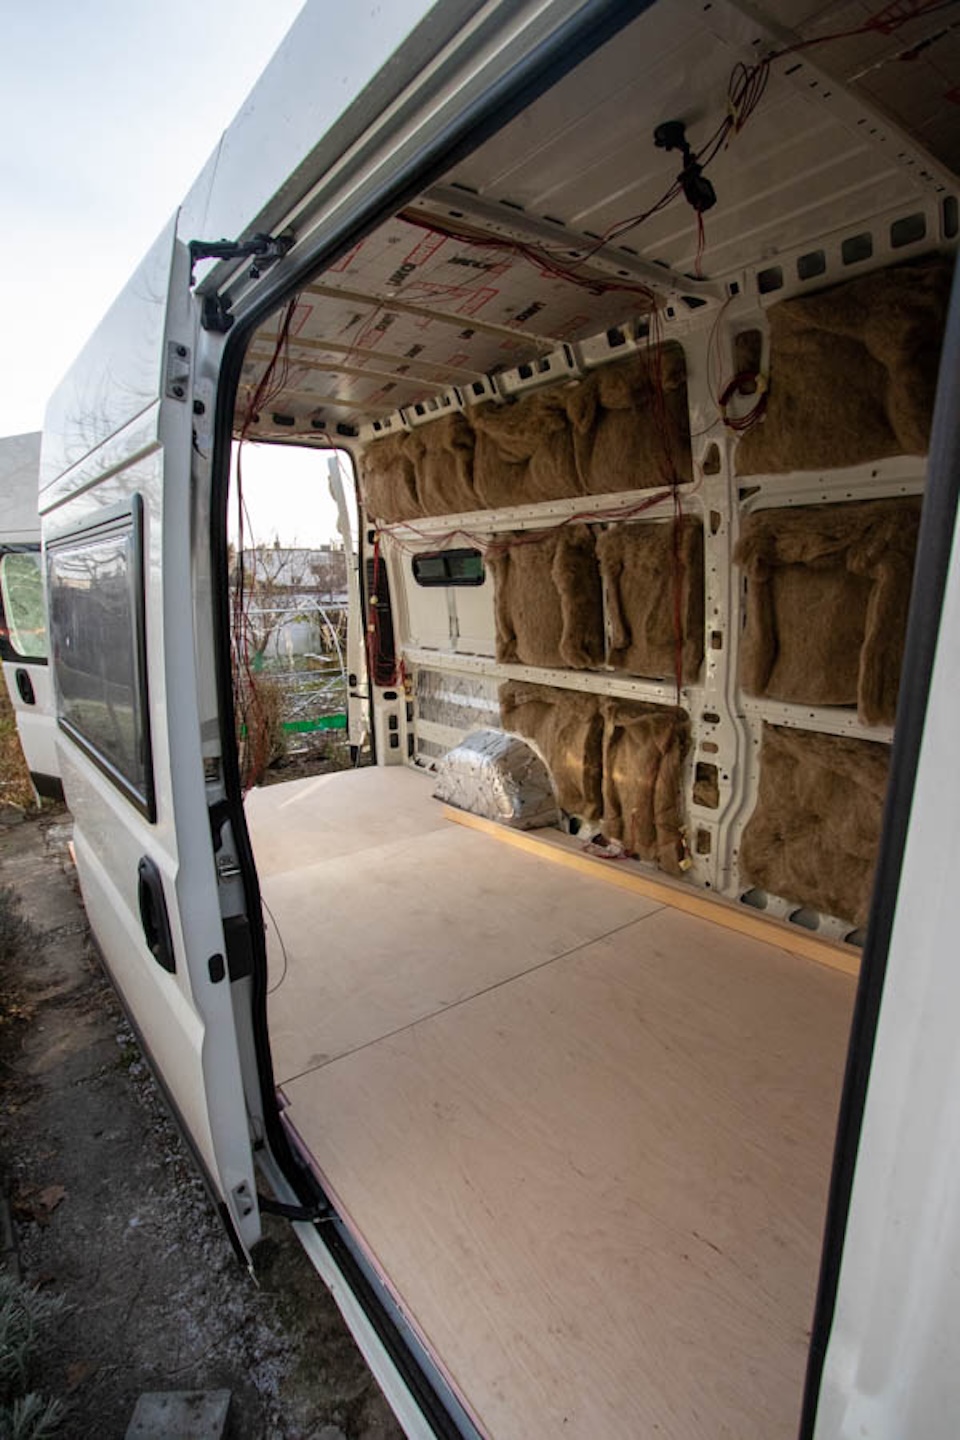
4. Insulation (Don’t Skip This Step)
Year-round vs. seasonal use
Insulation isn’t the most exciting part of a van build, but it’s one of the most important.
It’s what keeps you warm in winter, cool in summer, and – maybe most importantly – helps prevent condensation. And condensation is where problems start: moisture, mold, even rust over time.
For our van, we didn’t rely on just one material. Instead, we used a mix:
- Polyethylene foam
- XPS boards
- Sheep wool (my favorite – natural, breathable, and non-toxic)
- PIR boards
- Alufox reflective insulation
It might sound like a lot, but combining materials helped us insulate different parts of the van properly.
To finish everything, we covered the walls and ceiling with 9 mm (0.35 inch) wooden panels and painted them white. It made the whole space feel brighter and much more open.
We also added butyl mats for soundproofing. They really help with noise, especially while driving, but they’re heavy – so it’s something to think about if you’re trying to stay within weight limits.
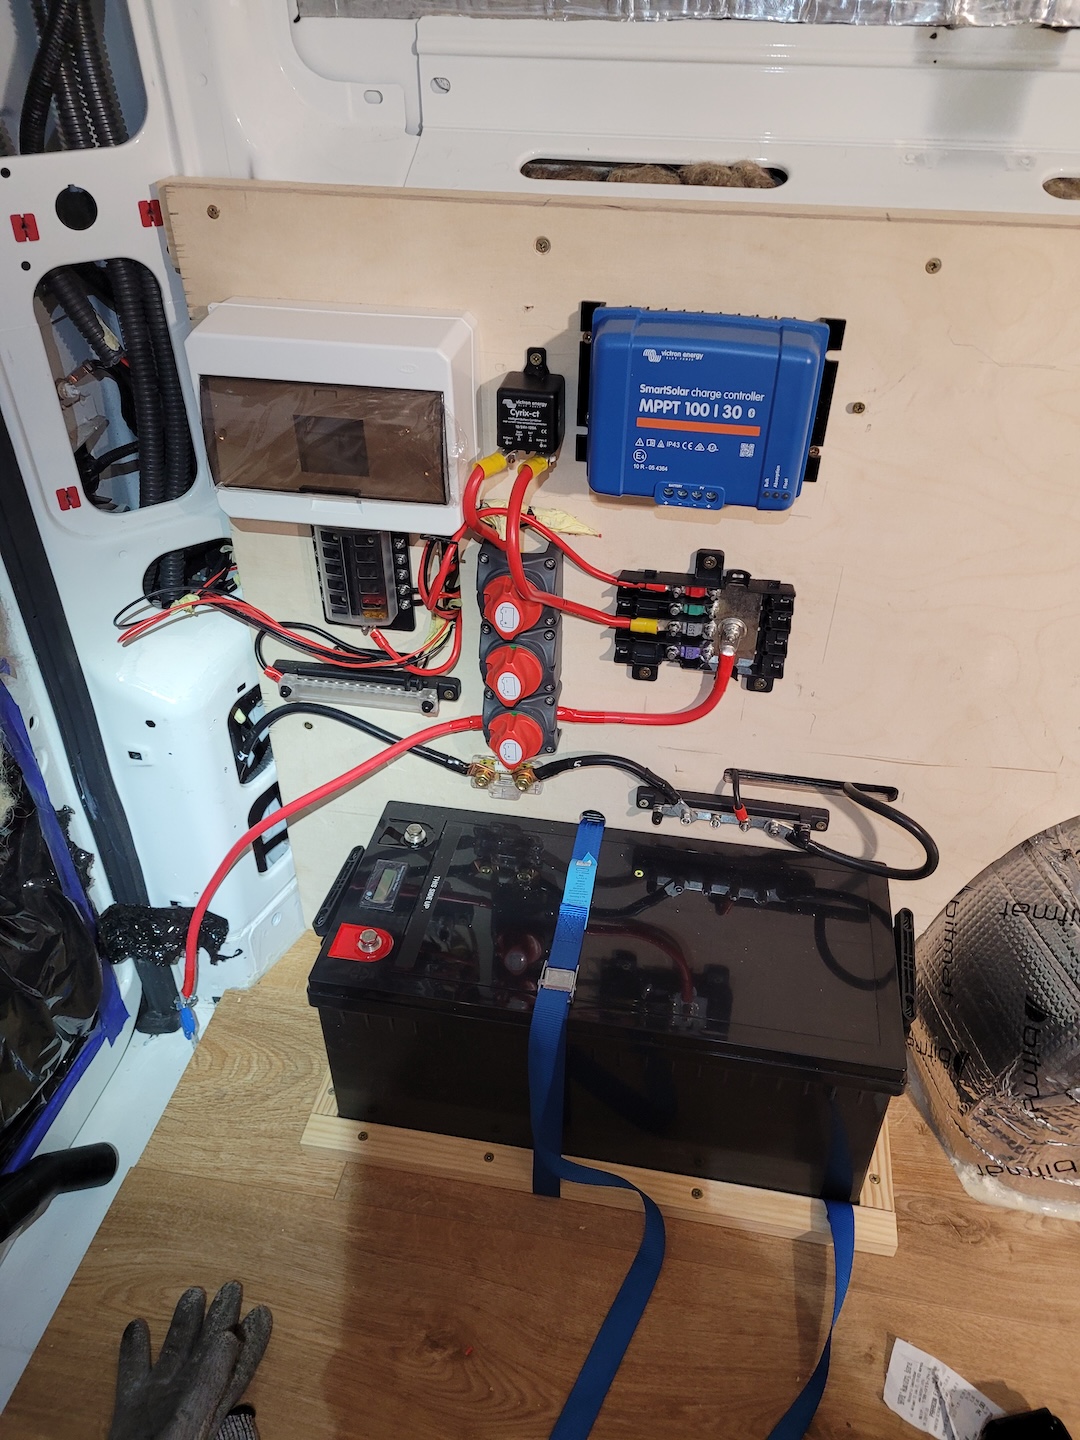
5. Electrical System (Powering Your Everyday Life)
Electricity is what makes van life actually comfortable. It powers almost everything – lights, water pump, fridge, charging your laptop or phone… all the small things you don’t think about until they stop working.
For our van, we kept things relatively simple but reliable:
A 200 Ah leisure battery
Separate from the main vehicle battery, so you never risk draining the engine battery.
350W of solar panels on the roof
This gives us a lot of freedom, especially when we’re off-grid for a few days.
A smart converter / charger
This allows us to charge the system in two ways – either from an external 230V hookup (like at a campsite) or directly from the alternator while driving.
This setup gives us enough power to run our laptops, fridge, and all the everyday essentials without constantly worrying about running out.
We also installed both 12V and 230V outlets throughout the van.
Most campervan appliances run directly on 12V, which is more efficient and easier on your system. But for regular household items – like a laptop charger or kitchen gear – you’ll need 230V through a converter.
Having both just makes life easier. You don’t have to think too much about what you plug in and where – it simply works.
6. Water, Gas, and Heating
For fresh water, we installed a tank connected to an electric pump that supplies water to both the sink and the shower.
We also added a gas-powered flow heater, which turned out to be one of those upgrades you really appreciate on the road. It gives us hot water and also helps heat the living space when it gets colder.
All the used water (from the sink and shower) goes into a gray water tank mounted underneath the van.
It’s not the most exciting part of the build, but it’s essential if you want to travel responsibly and stay in places that aren’t full-service campsites.

Thinking about building your own van but feeling a bit overwhelmed by all the details?
I’ve been there. That’s exactly why I put together everything we learned along the way – the mistakes, the things that took longer than expected, and the small decisions that made the biggest difference.
If you want something more structured, you can grab my Ultimate Van Build Checklist and use it as a simple starting point for your own conversion.

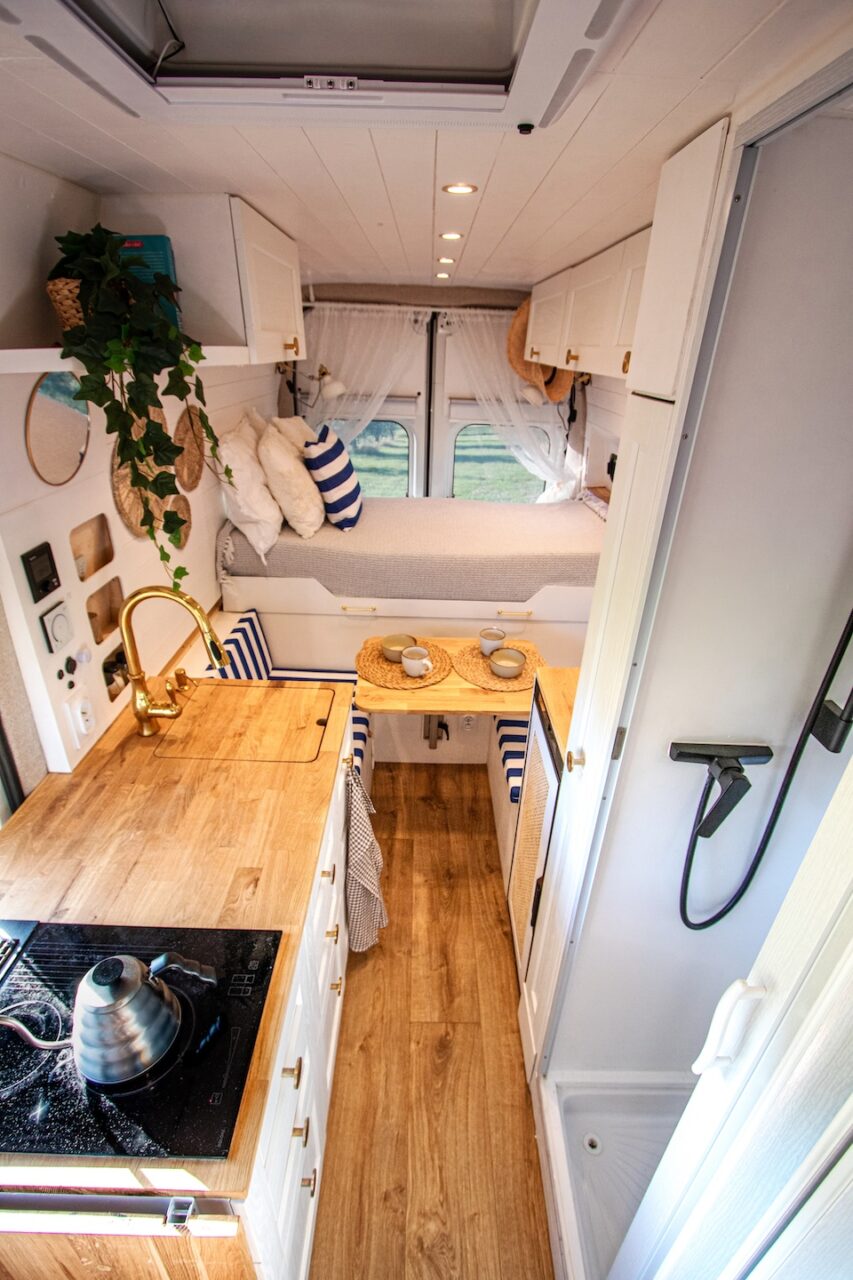
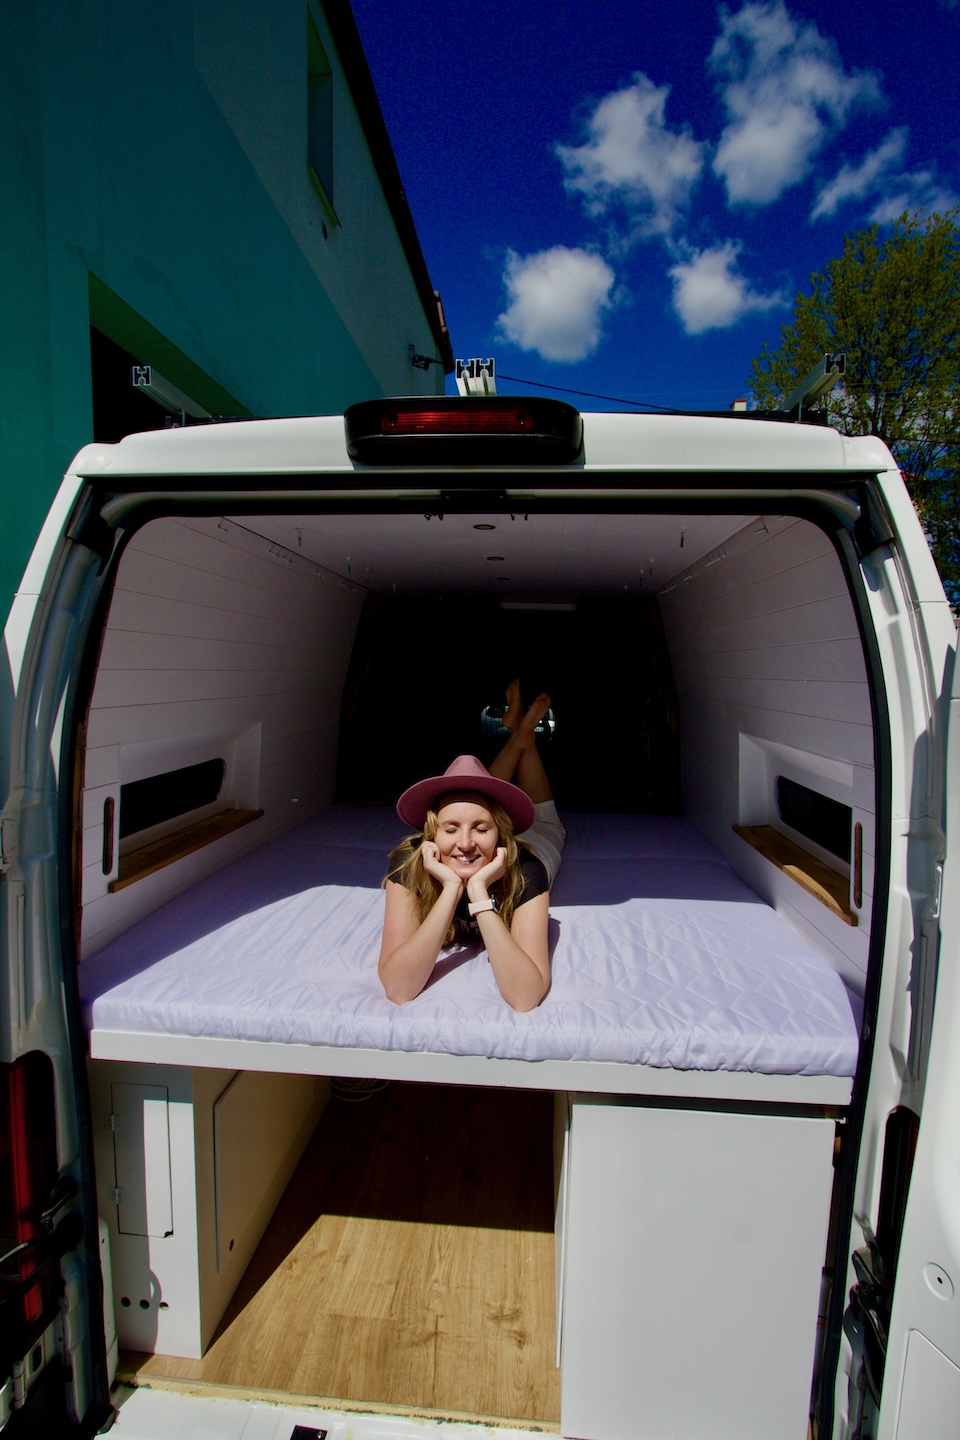
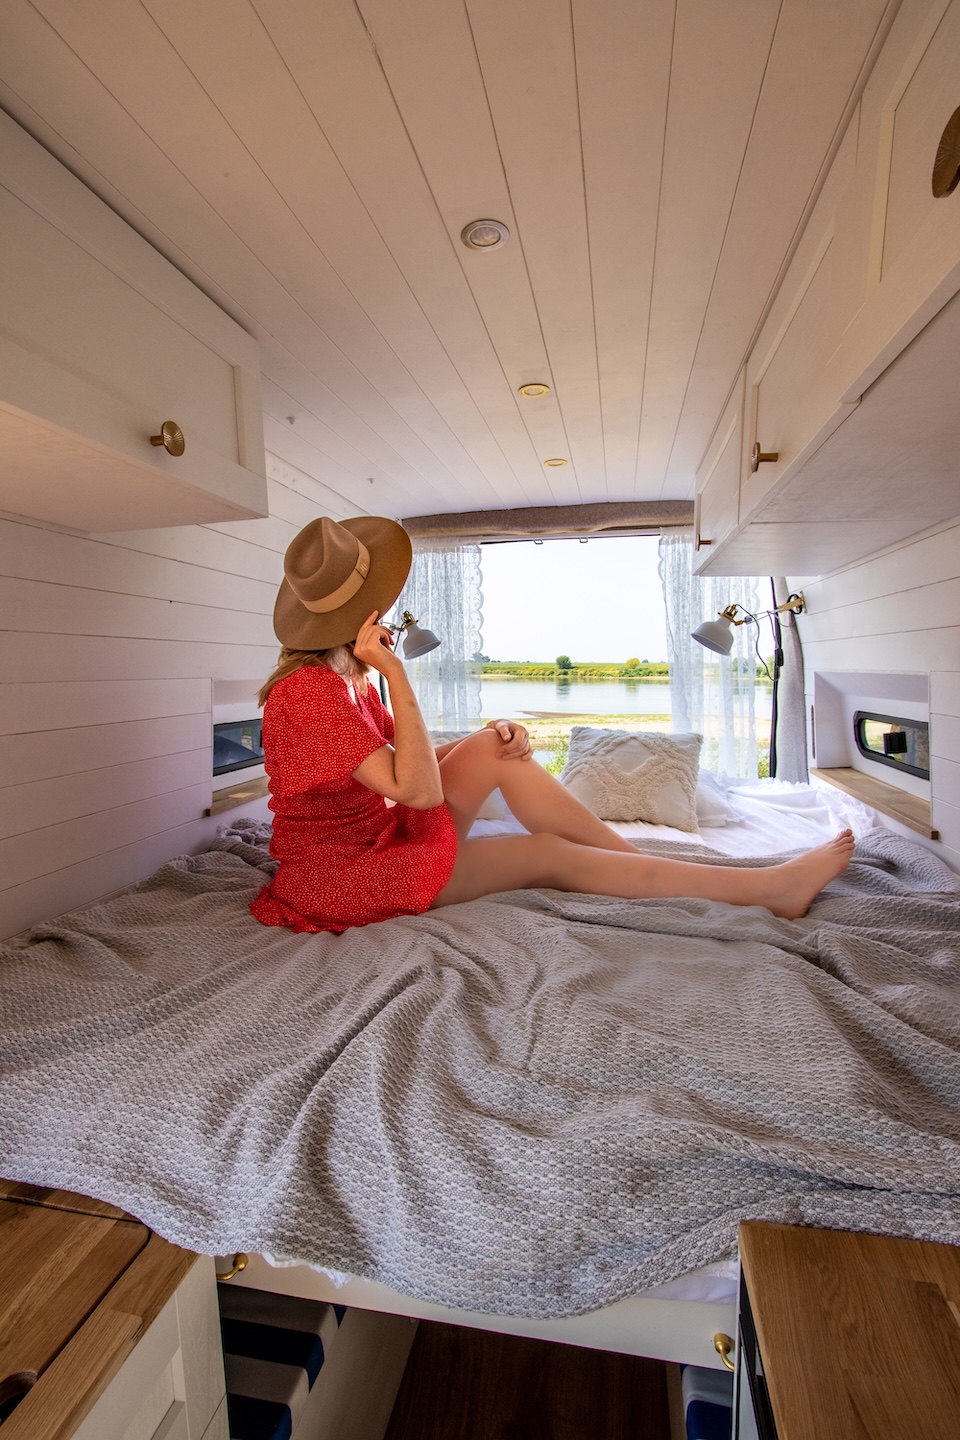
7. Bed Design (The Heart of Your Van)
The bed is probably the most important part of your campervan. After all, you’ll spend a huge part of your time there – sleeping, resting, hiding from the heat, or just slowing down after a long day.
We went back and forth on this more than anything else.
Here are the main options we considered:
Fixed platform bed
The simplest to build and super solid. But it takes up permanent space, so you lose flexibility during the day.
Pull-out bed
More complex, but it gives you extra space when you’re not sleeping. This is what we chose, and it really changes how the van feels during the day.
Dinette conversion
You get a seating area that turns into a bed, which sounds great – but you lose storage and have to rebuild your bed every night.
Murphy / wall bed
Saves space, but it’s one of the more complex options to build and not always worth the effort unless you really need it.
In the end, we went with a pull-out bed positioned above our seating area.
During the day, part of the bed transforms into a bench, supported by a Lagun leg system. The table swivels, which makes the whole space feel surprisingly flexible – we can use it for meals, work, or just sitting with a coffee.
It’s one of those solutions that really changes how the van feels during the day, not just at night.
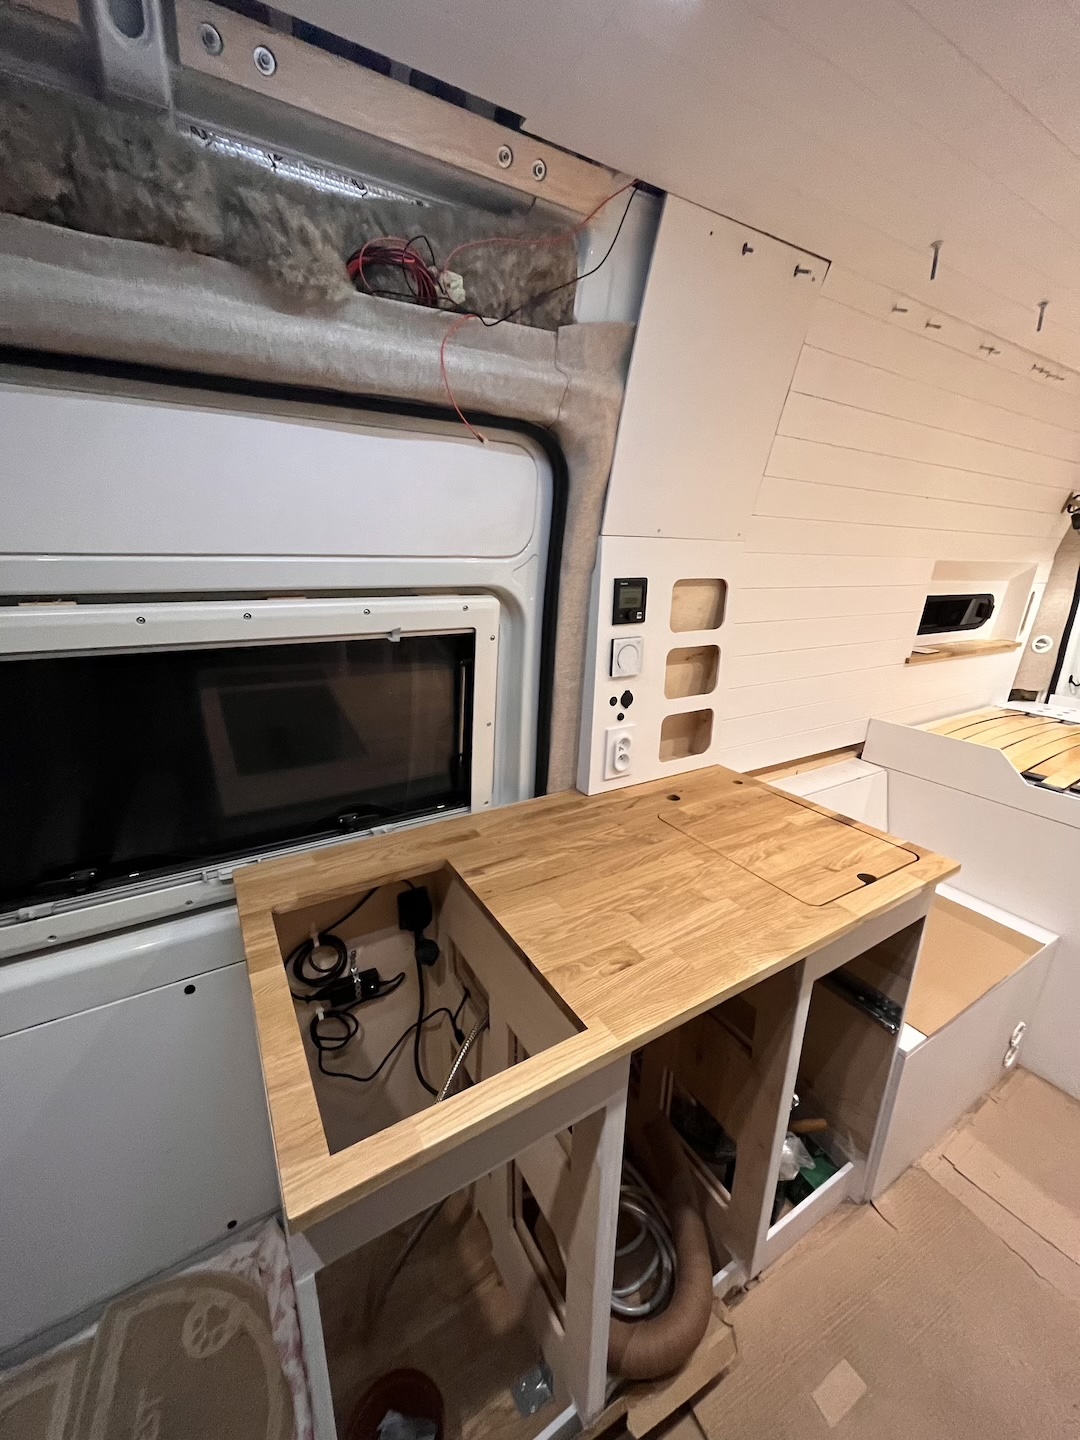
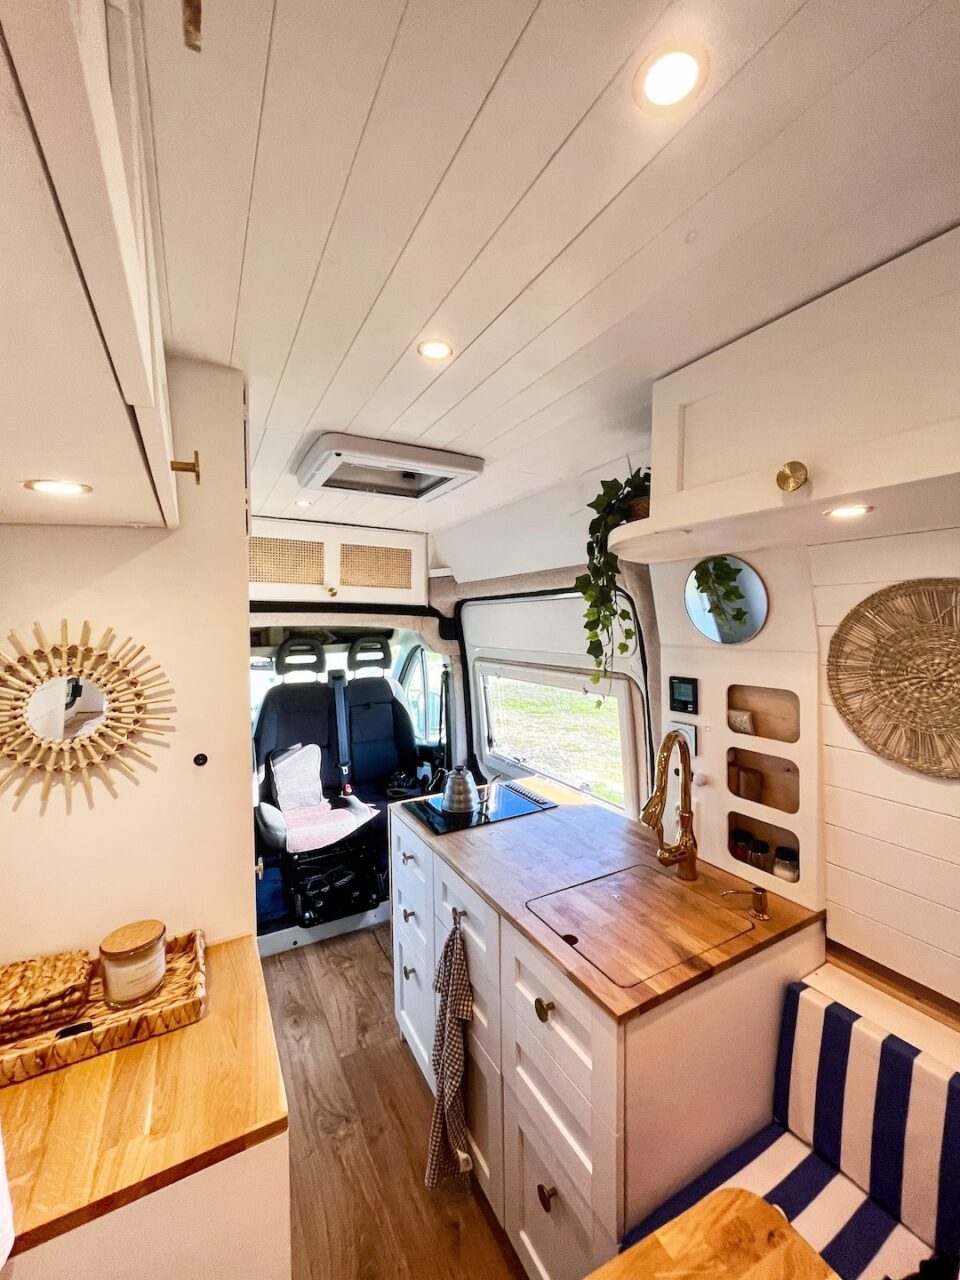
8. Kitchen Area (More Than Just Cooking)
Kitchen Requirements
Kitchen requirements
In Poland (where I’m from), campervans legally need to have a designated food preparation area. So this wasn’t just about comfort – it was something we had to include.
Our kitchen is simple, but it works really well for everyday life:
A stainless steel sink with a pull-out faucet
Super practical, especially when you’re dealing with limited space.
A solid oak countertop (2 cm / 0.8 inch)
We wanted something natural and durable – and honestly, it makes the whole space feel warmer.
A flameless gas cooktop
Compact and easy to use, without taking up too much room.
Storage cabinets and drawers (plywood)
Nothing fancy, but designed exactly around what we needed.
We also installed a 12V camper fridge, which makes a huge difference if you’re spending more than a day or two on the road.
Being able to keep fresh food (and cold drinks) completely changes the experience.
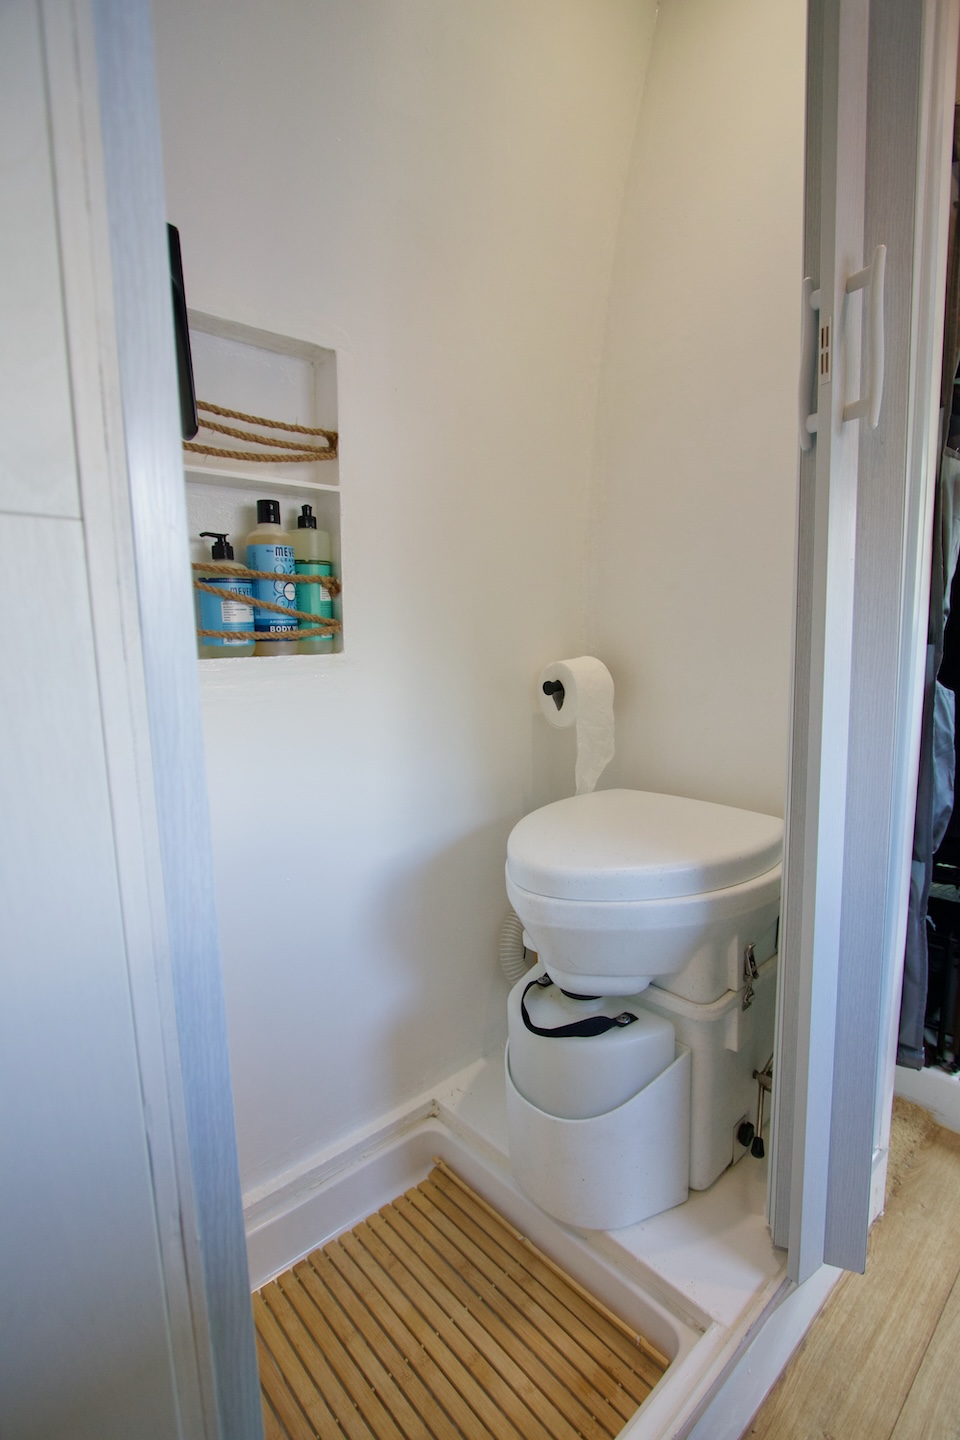
9. Bathroom (Luxury or Necessity?)
Adding a bathroom is definitely optional – but it gives you a kind of freedom that’s hard to go back from. No more looking for public restrooms or planning your day around campgrounds.
Our bathroom is tiny (100 × 60 cm / 39 × 24 inches), but it does exactly what we need:
A 60 × 60 cm (24 × 24 inches) shower tray
Small, but enough for a quick shower after a long day.
A composting toilet (Nature’s Head composting toilet)
Simple, practical, and surprisingly easy to manage once you get used to it.
A door that doubles as a shower wall
When closed, it creates a separate shower space – which makes everything feel a bit more organized and less messy.
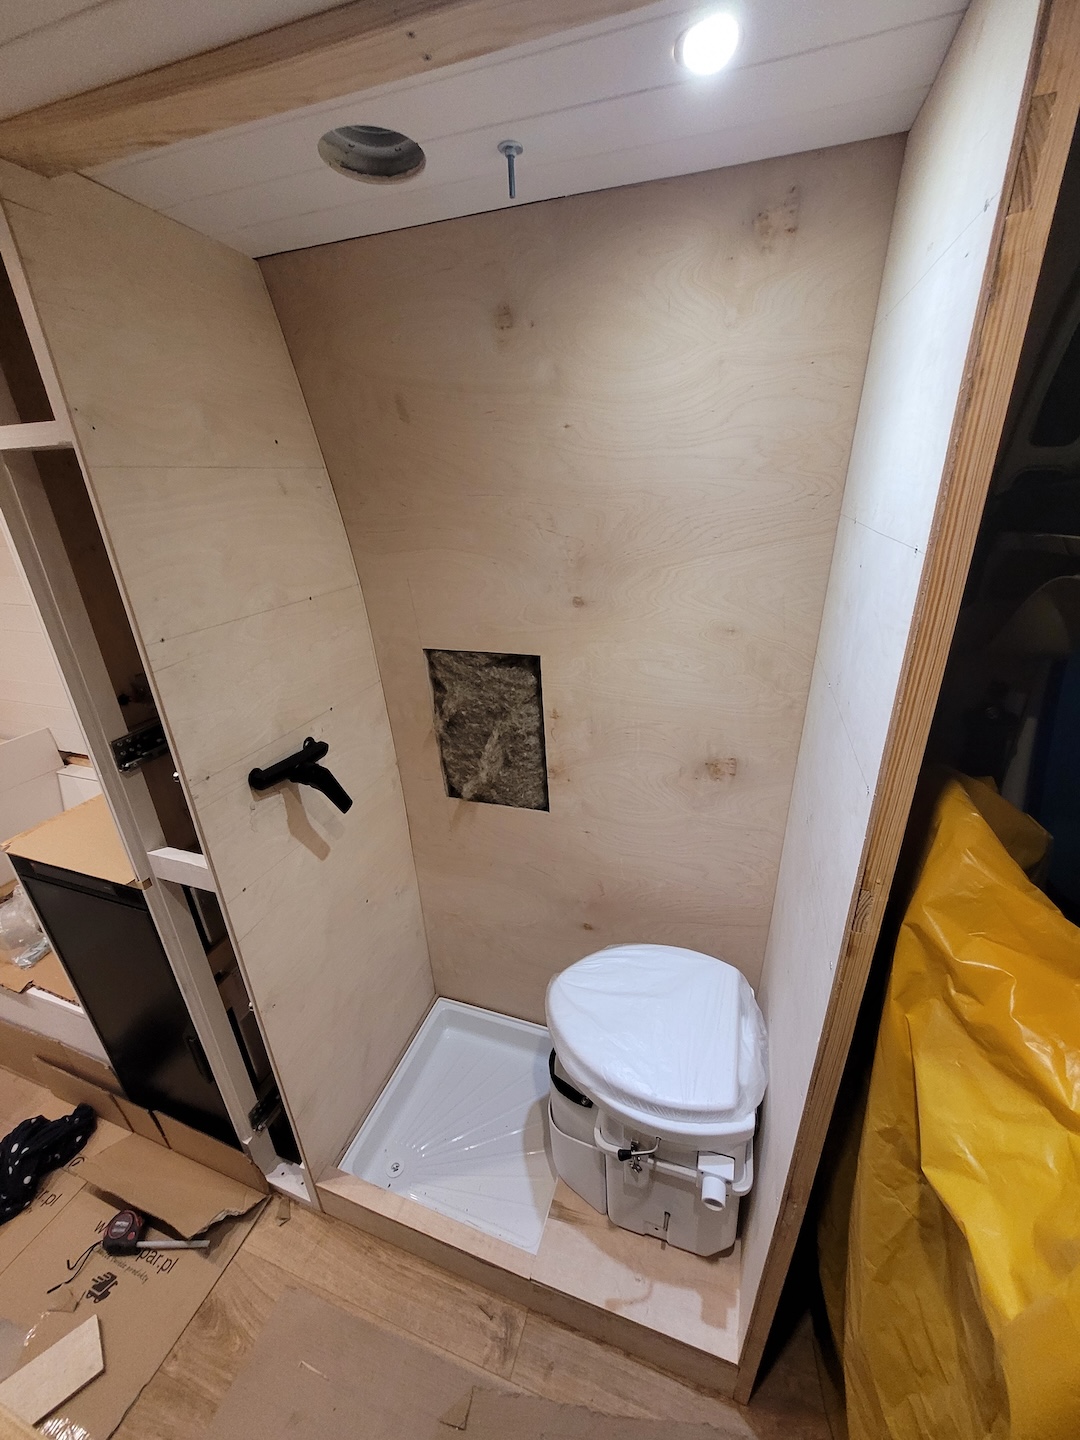
We built the shower enclosure from marine-grade plywood, sealed with yacht paint to make it fully waterproof.
Getting all the corners properly sealed was honestly one of the trickiest parts of the whole build – but it was absolutely worth the effort.
We chose a composting toilet over a chemical one because it felt more eco-friendly and easier to manage on longer trips.
Yes, the upfront cost was higher, but looking back, we’re really happy with that decision.
10. Making It Feel Like Home
For me, this was the most fun part of the whole build.
After months of construction, planning, and problem-solving, we finally got to slow down a bit and make the space feel like ours.
We didn’t want it to feel like a typical RV – clean but a bit sterile. We wanted something warmer, softer, more personal. A space you actually want to spend time in.
We leaned into a coastal bohemian style, with:
- Natural materials wherever possible
- Calming colors – mostly whites, soft blues, and natural wood tones
- Personal touches like handmade curtains and cushions
- Small details that simply make us feel good
For the technical parts of the build, we kept things quite simple and practical. But when it came to the interior, we were much more intentional – choosing pieces that matched the feeling we wanted to create.
Because in the end, it’s not just about how the van works. It’s about how it feels when you’re inside.
11. Essential Accessories
Beyond all the built-in elements, it’s the small things that really make van life comfortable.
These are the things we always carry with us:
Folding camping chairs and a table
Perfect for slow mornings outside or simple dinners with a view.
A yoga mat
For stretching, quick workouts, or just a soft spot to sit outside.
Thermal window covers
Honestly essential – for privacy, temperature control, and better sleep.
Extra pillows and blankets
We chose ones that match the interior, so the whole space still feels cohesive.
Kitchen basics
Pots, utensils, and just enough to cook simple meals without overloading the space.
Bathroom essentials
The small things that make daily routines feel normal, even on the road.
Once you’re on the road, you’ll discover even more ways to optimize your setup. My 20 Genius Vanlife Hacks covers all the clever tricks I’ve learned from actual van life experience!
12. Registration and Paperwork
TThe final hurdle was registering our van as an official RV.
In Poland, that meant meeting a few basic requirements:
- A designated sleeping area
- A proper food preparation space
- Seating and a table that can be stowed while driving
On top of that, we had to go through a technical inspection, weigh the vehicle, pay excise duty, and submit all the required paperwork.
It’s not the most exciting part of the process, but it’s an important one – and it can take more time than you expect.
Regulations vary a lot depending on the country, so it’s worth checking everything early on, before you start building. It can actually influence your layout decisions more than you think.

Skills You’ll Need (Or Learn Along the Way)
Building a campervan taught me skills I honestly never thought I’d have.
You don’t need to know everything before you start – but you will learn along the way:
Woodworking
Most of your interior will be custom-built, so you’ll get very familiar with wood, tools, and fixing your own mistakes.
Basic electrical knowledge
Understanding the difference between 12V and 230V systems is essential – and less scary than it sounds once you get into it.
Plumbing
Setting up water tanks, pumps, and pipes is actually quite manageable, even if you’ve never done it before.
Gas safety
This is one area where it’s worth being extra careful. If you’re unsure, getting professional help is a really good idea.
Metalwork
Cutting holes for windows and vents feels intimidating at first – but it’s part of the process.
What’s your next step in your van conversion journey?
f you’re just getting started, here are a few places you might want to go next:
🔧 Build essentials → Practical tips to avoid common mistakes we made
❓ Got questions? → Everything I wish I’d known before starting
⚠️ Before you start → Small decisions that can save you time, money, and stress
🎒 Van life ready? → What actually matters once you’re on the road
What part of the process excites you the most?
FAQ: Questions I Get Asked Most Often
What insulation materials work best?
Look for materials with good thermal performance that are also safe to use – ideally non-flammable and non-toxic.
For our van, we ended up using sheep wool in most areas. It’s natural, breathable, and handles moisture really well, which is important in such a small space.
There are plenty of options out there, but for us, it felt like the best balance between performance and peace of mind.
What materials should I use for cabinets?
Birch plywood is one of the most popular choices – and for a good reason. It’s strong, relatively lightweight, and easy to work with.
You can use different thicknesses depending on what you’re building:
- 3 mm (0.12 inch) → for decorative elements
- 6.5 mm (0.26 inch) → for lightweight panels
- 12 mm (0.47 inch) → for most cabinets
- 18 mm (0.71 inch) → for structural parts like seats or frames
Using the right thickness in the right place really helps keep the weight down without sacrificing stability.
What tools helped with design?
You don’t need anything overly complicated – we used a mix of simple and more advanced tools:
Microsoft Excel or Google Sheets
Great for tracking your budget and estimating costs as you go.
Pinterest
Perfect for collecting ideas and building a vision for your van.
SketchUp
Really useful if you want to visualize your layout or design furniture. It takes a bit of time to learn, but it’s worth it.
Pen and paper
Still one of the best tools. Quick sketches and exact measurements saved us more than once (and yes, always double-check).
Cardboard or plywood templates
Honestly underrated. Making simple mock-ups helped us understand the space so much better before cutting anything for real.
How much did it cost?
Our full conversion (including the van itself) cost us around $40,000.
We tracked every category perfectly along the way, so if you’re curious about the breakdown and what we spent money on, I’ve shared all the details in a separate post.
Travel lighter, even before you leave.
start with something simple.
Download The Minimum Plan – Slow Travel:
Final Thoughts (Was It Worth It?)
Building our campervan was honestly one of the most challenging – and most rewarding – things I’ve ever done.
There were definitely moments when I questioned everything. Like when we were troubleshooting the electrical system for the third time… or when I realized we had measured the bathroom door wrong.
But now, sitting here and writing this from our van, parked somewhere by a quiet lake in Europe, I can say it was all worth it.
Every late night spent researching. Every weekend covered in sawdust. Every moment of “why didn’t we just buy a ready-made RV?”
All of it led to this.
Because what makes a self-build special isn’t just the money you might save. It’s knowing how everything works.
Being able to fix things yourself. And having a space that’s completely yours – built around how you actually want to live and travel.
Our van isn’t perfect. I still notice small things I’d do differently next time.
But it’s ours.
And every little imperfection tells the story of how we figured it out, step by step.
Ready to start your own van conversion adventure?
- Build Planning Guide – avoid my mistakes with proper preparation
- 20 Must-Know Questions – plan like a pro
- Van Life Hacks – real-world tips from someone who’s lived it
- Layout Inspiration – steal ideas from successful builds
If you’re thinking about building your own van but something is holding you back – I’d really love to hear what it is.
Sometimes it’s the budget, sometimes the skills, and sometimes it’s just not knowing where to start.
You can leave a comment below – I’m always happy to share what worked for us (and what didn’t).
And if this guide helped you, you can save it for later or send it to someone who’s also dreaming about van life.
It’s a lot easier when you’re not figuring it all out alone.