
Thinking about your campervan layout and looking for some inspiration?
I’ve put together 10 different layout ideas – each with a simple floor plan – to help you start shaping your own space.
You’ll find a mix of setups here. Some are more classic, with a dining area and plenty of storage. Others are a bit more compact or include things like a shower or toilet.
The goal isn’t to copy one layout exactly, but to see what’s possible – and start thinking about what would actually work for you.
Because in the end, a good layout isn’t about fitting everything in. It’s about creating a space that feels right for how you want to live and travel.
Let’s take a look.
Want to learn more about traveling by campervan?
On my Van Life Hub, you’ll find more articles on building a campervan, van travel, real costs of van life, and practical tips from routes across the U.S.
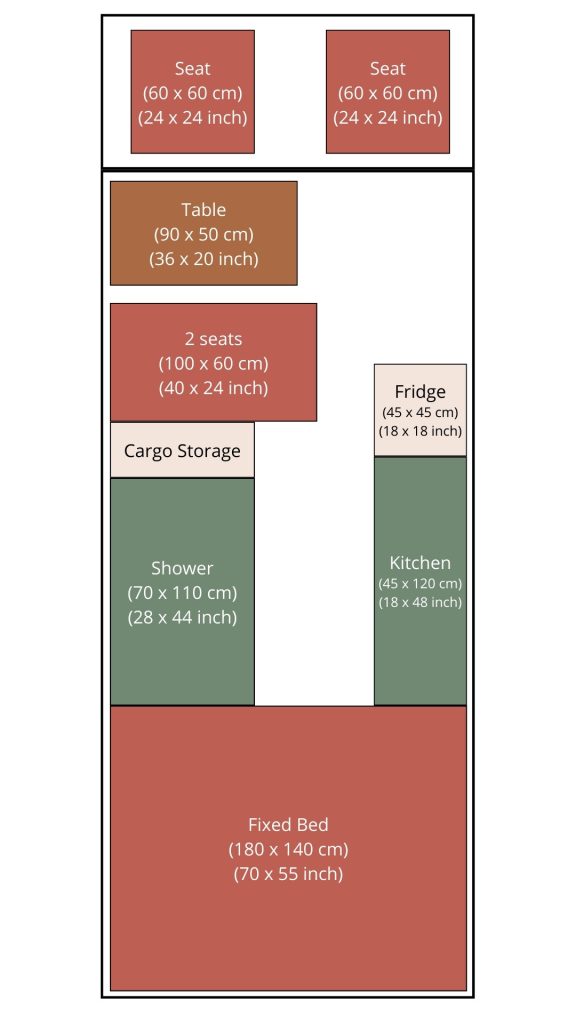
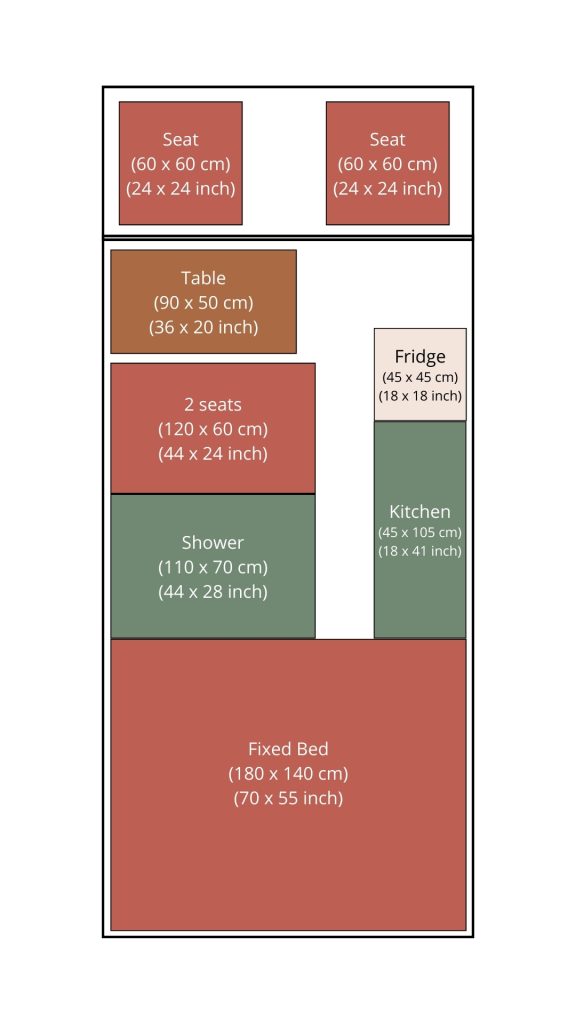
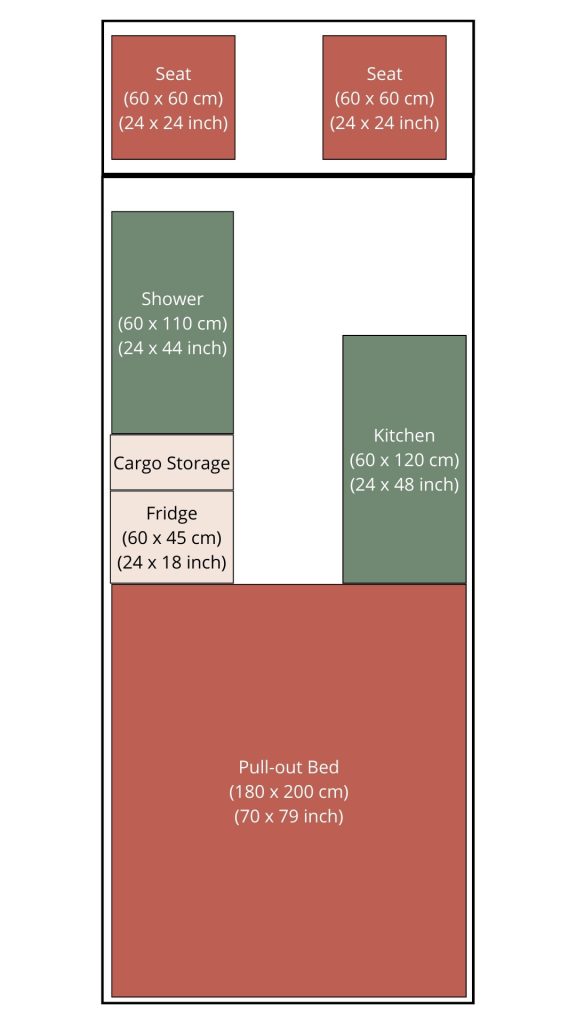
1. The Fixed Bed Van Build Layout
The fixed bed layout is one of the most popular choices – mainly because it’s simple and comfortable.
With a permanent bed, you don’t have to fold or rearrange anything at the end of the day. It’s always there, ready when you need it. And underneath, you get a large storage area, which is perfect for bigger items or things you don’t use every day.
The trade-off is space. A fixed bed takes up a big part of the van, so you’ll have less room to sit, work, or move around during the day.
But if comfort matters most to you – and you like the idea of an always-ready bed with plenty of storage – this layout just works.


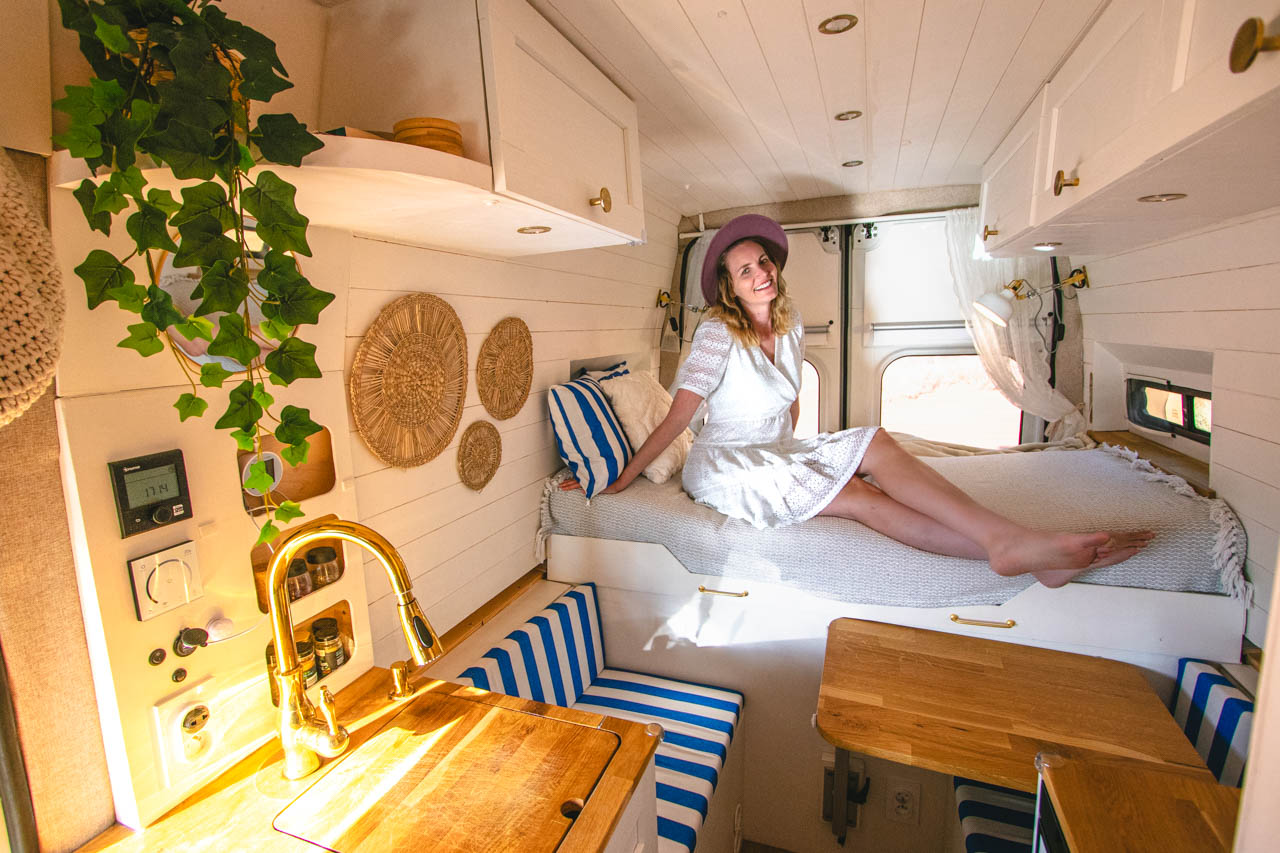
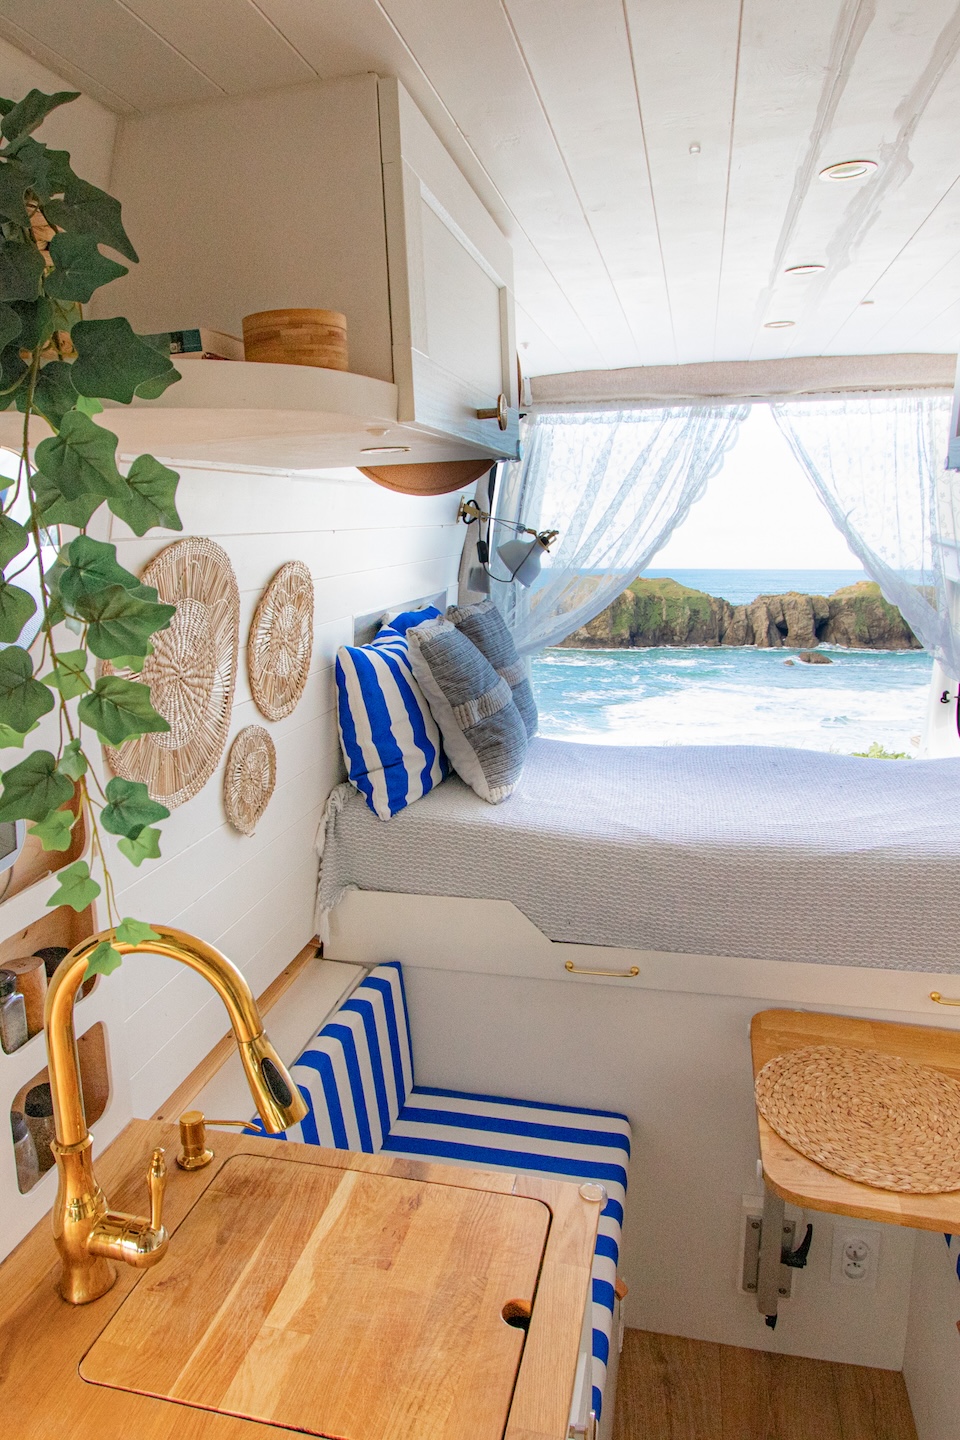
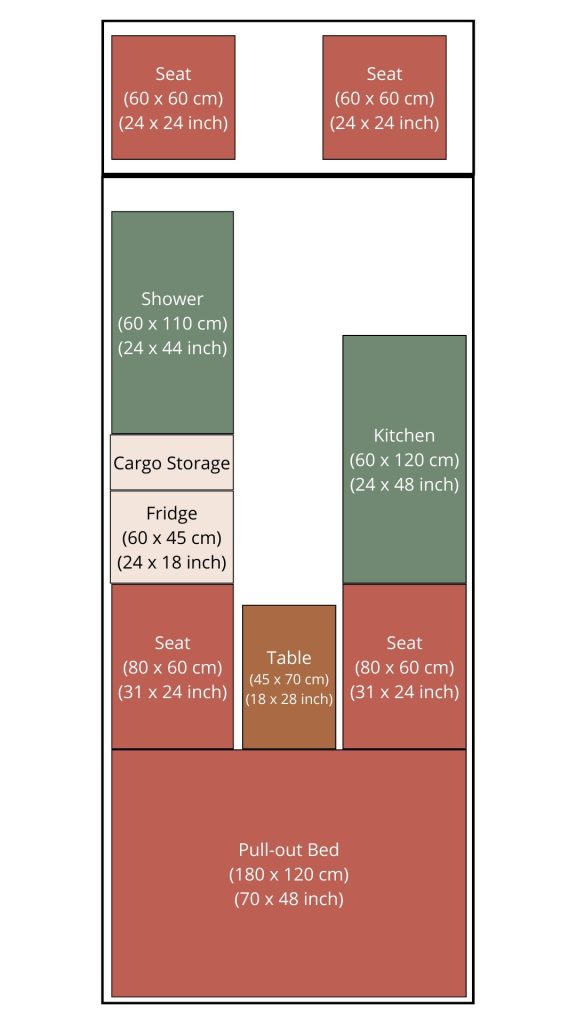
2. The Pull-Out Bed Setup
Another really practical option is a pull-out bed – and it’s actually what we chose for our own van.
The biggest advantage is flexibility. During the day, you can tuck the bed away and gain much more space for living, working, or just moving around comfortably.
Of course, there are a few trade-offs. Folding and unfolding the bed every day can get a bit repetitive over time. And depending on how you build it, the sliding system may need occasional maintenance.
That said, it’s a great choice if you want a layout that adapts to your day.
It also works especially well for taller people who can’t sleep comfortably across the width of the van – a pull-out setup gives you more freedom with bed length.
If having a flexible, multi-use space matters to you, this layout makes a lot of sense.
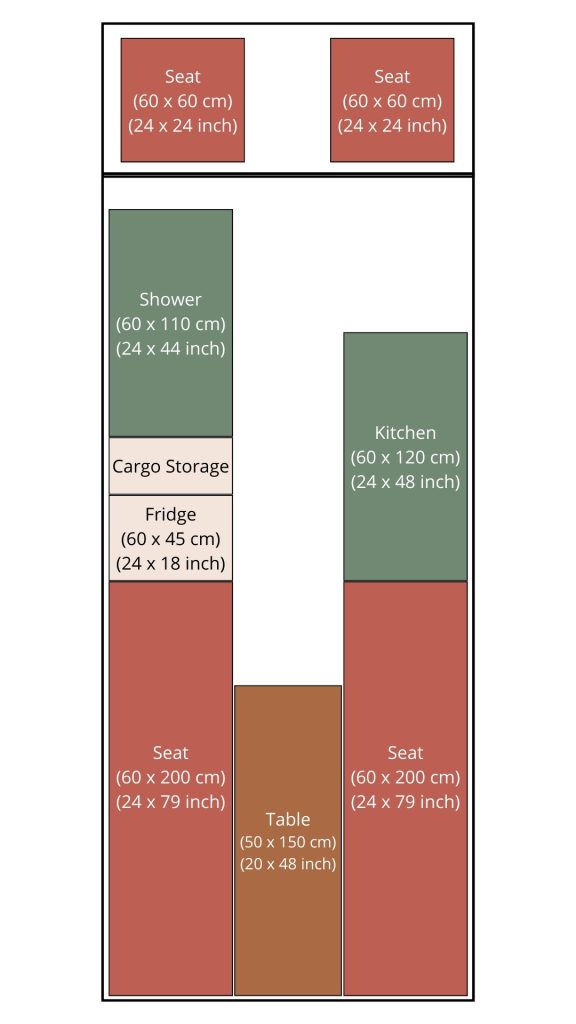
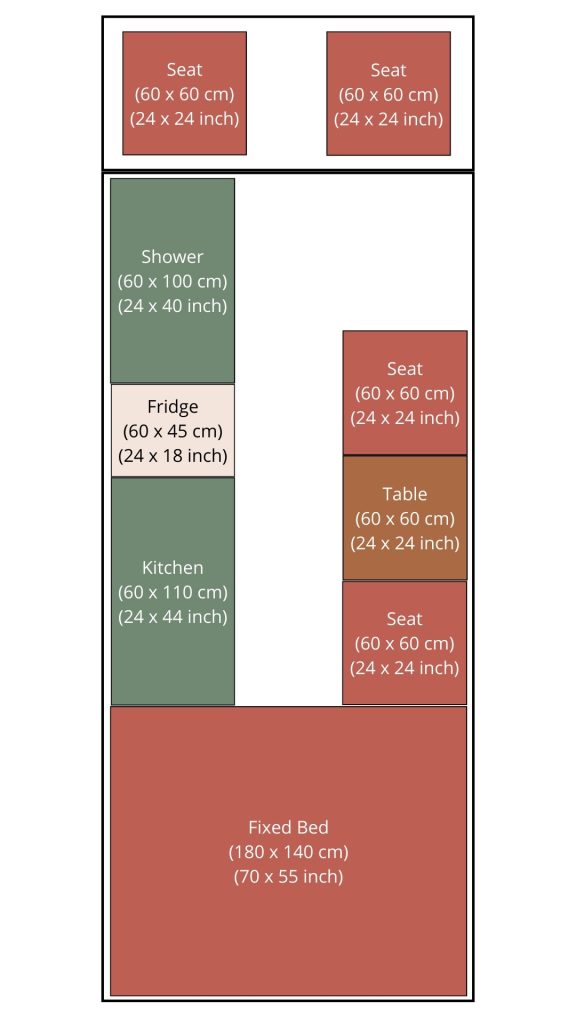
3. The Dinette Van Build Layout
The dinette layout is one of the most versatile options you can choose.
It combines a seating area with a table that transforms into a bed, so the same space works for eating, working, and sleeping. During the day, you get a comfortable place to sit and a surprisingly open feel inside the van.
It’s also great if you want extra seating or plan to work remotely – having a proper table setup makes a big difference.
Of course, there are a few trade-offs. You’ll need to convert the space into a bed every evening, which can get a bit tiring over time. And these types of beds are usually not as comfortable as a fixed one.
Storage is another limitation. Without a dedicated “garage” under the bed, you’re mostly working with space under the benches – which can be tricky if you’re carrying larger gear.
Still, if flexibility and a multi-use space matter most to you, this layout works really well.

Not sure which van layout actually fits your lifestyle?
Before you start building, this step-by-step guide walks you through the real decisions – from daily routines and storage needs to sleeping setups and work space.
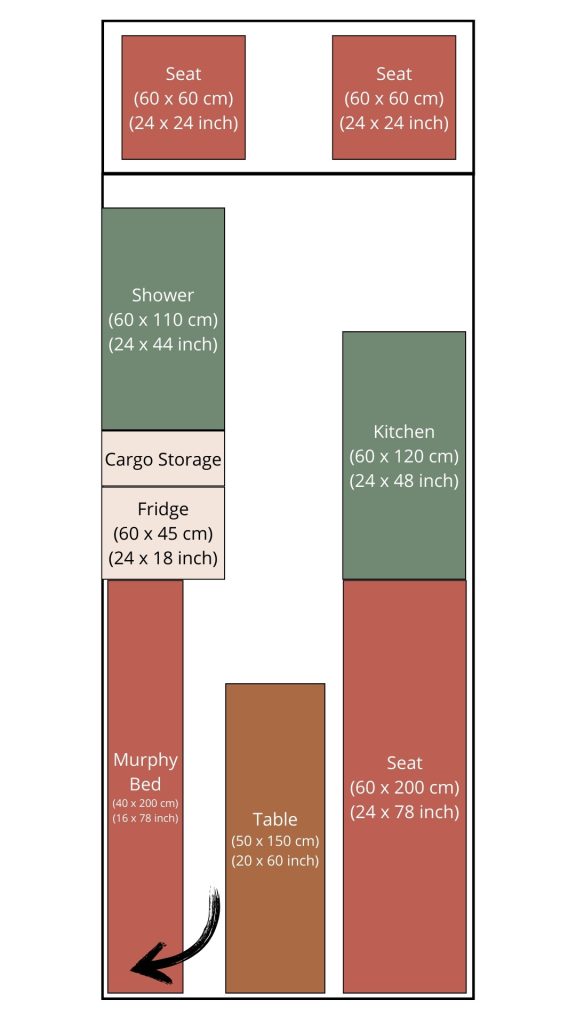
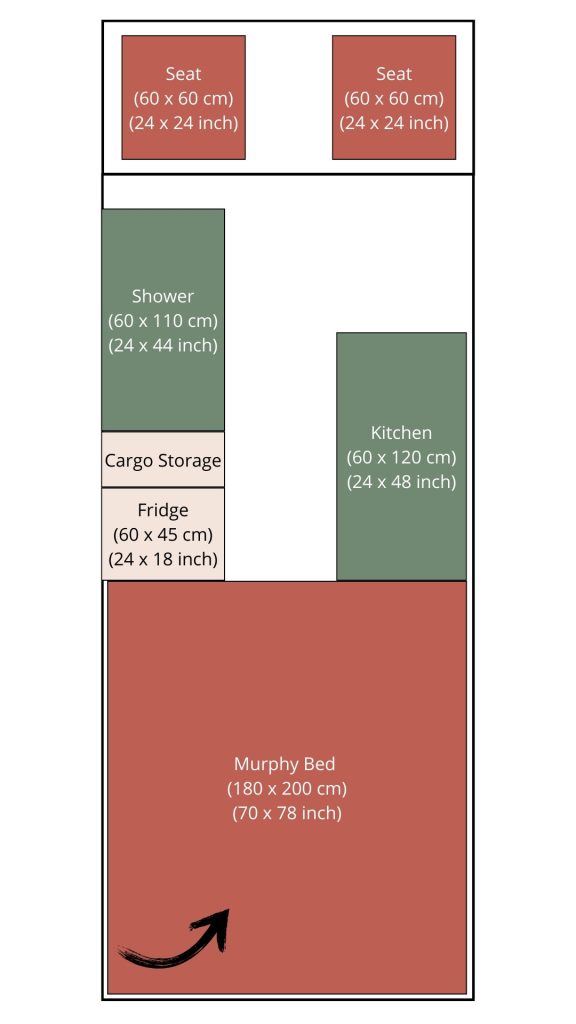
4. The Murphy Bed Setup
If you’re looking for something a bit different, a Murphy bed (wall bed) is an interesting option.
The bed folds up against the wall when you’re not using it, which frees up a lot of space during the day. It gives the van a more open feel and makes it easier to move around.
When you pull it down, it feels much closer to a regular bed than most convertible setups – which is a big plus for comfort.
But it does come with a few trade-offs. The mechanism is more complex, so it takes more effort (and cost) to build properly. It also uses wall space, which means less room for cabinets or storage.
And compared to a fixed bed, you’ll usually have less overall storage.
Still, if you want a more open layout and like the idea of a flexible, slightly different setup, this can work really well.
Want to keep things simple while planning your van build?
I’ve put together a practical Ultimate Van Build Checklist – a calm, step-by-step overview of the key decisions, so you don’t forget the important stuff or overcomplicate the process.
If you’d like it, you can get it here:

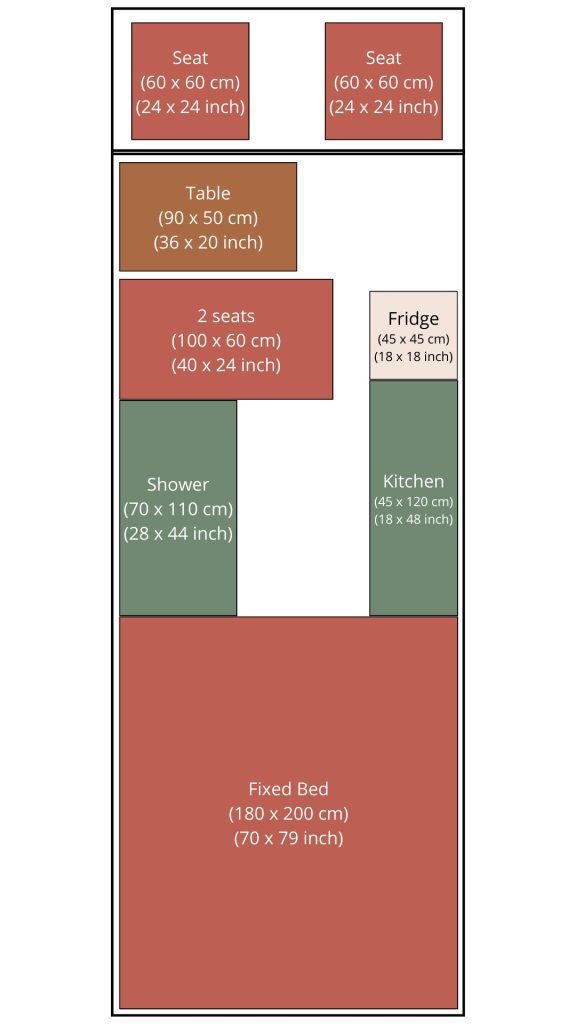
5. The Full Bathroom Van Build Layout
Adding a bathroom is definitely something worth considering when planning your layout.
It brings a lot of comfort and privacy – but more than anything, it gives you freedom. Especially when you’re off-grid and don’t want to rely on campsites or public facilities.
At the same time, there are real trade-offs.
A bathroom takes up a noticeable amount of space – space you could use for living or storage. It also adds weight and increases the overall cost of your build. And there’s the ongoing maintenance: cleaning, managing water, and emptying tanks.
But for us, it was absolutely worth it.
We chose to include a bathroom in our van, and it made everyday life on the road so much easier and more comfortable.
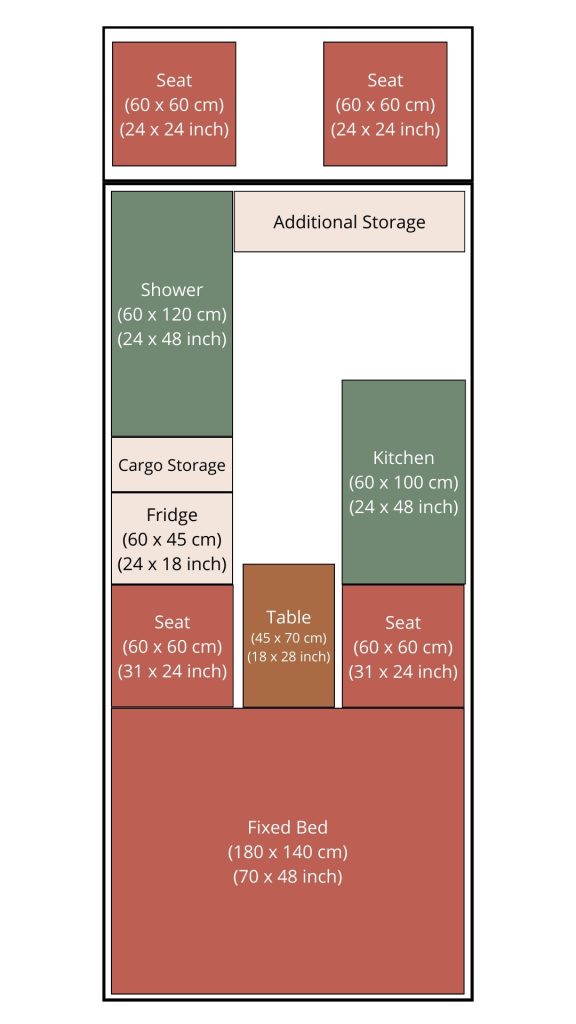
6. The Divider Wall Setup
Another layout to consider is one with a divider wall between the driving area and the living space.
It adds a sense of separation, which can make the van feel more organized and a bit more private. You can also use the wall itself – for extra storage, shelves, or even a small work surface.
There are some practical benefits too. It can improve insulation (since a lot of heat escapes through the front windows) and adds an extra layer of security.
But it does come with trade-offs.
A fixed divider can make the space feel more enclosed, and it limits movement between the front and the back of the van – which can be inconvenient, especially on the road.
Still, if you value privacy and a more structured layout, this setup can work really well.
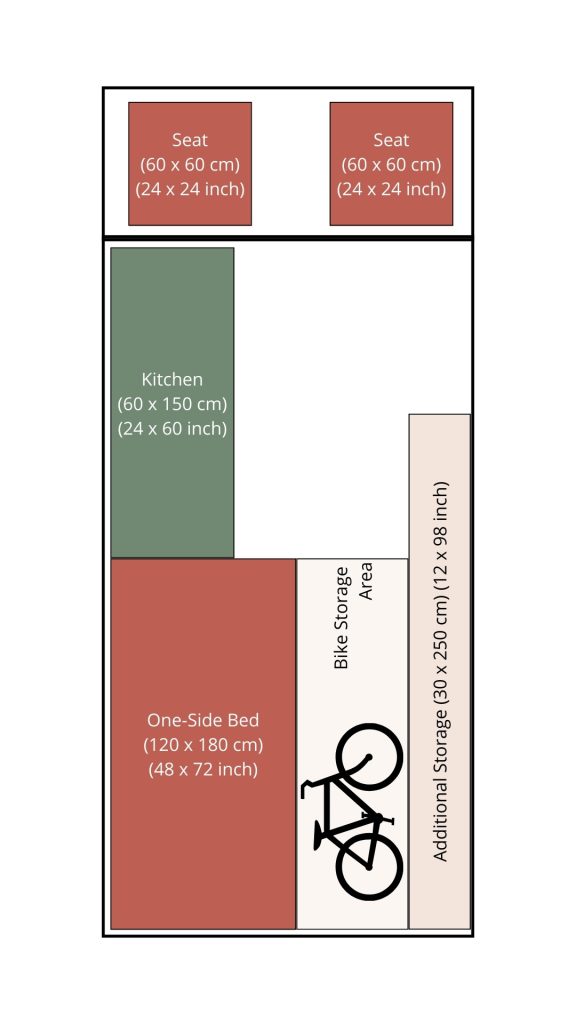
7. The Single-Side Bed Setup
This layout places the bed along one side of the van.
It’s a smart way to use space, especially if you need more storage – you can easily add cabinets or shelves along the opposite wall.
Another advantage is access. You can move freely through the van and use the rear doors without obstacles. A lengthwise bed also tends to be longer, which makes it a good option if you’re tall.
There are a few trade-offs, though. The bed can feel a bit narrow for two people, and you’ll usually have less “garage” space underneath.
Because of that, this setup often works best for solo travelers or anyone who wants more utility space.
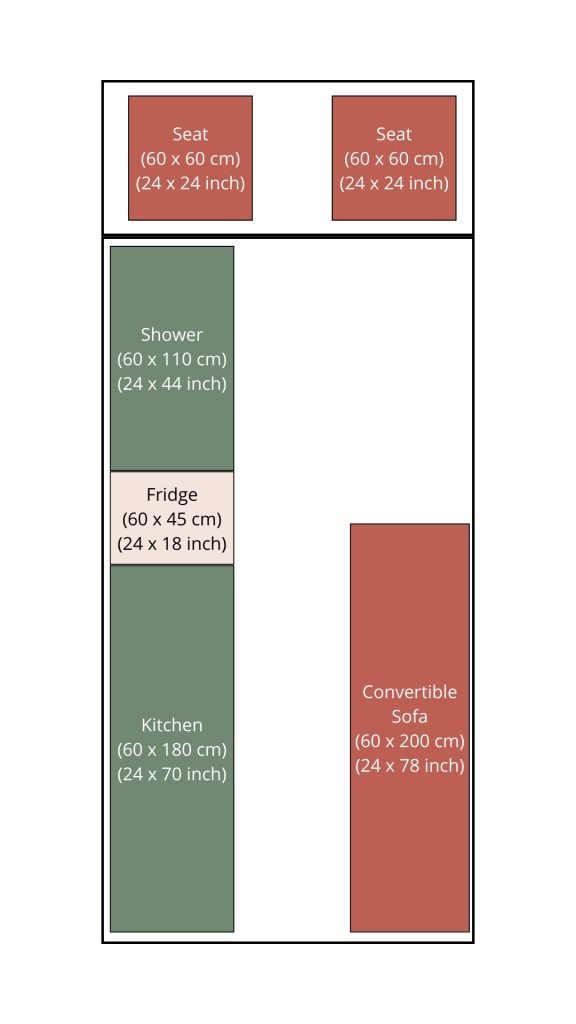
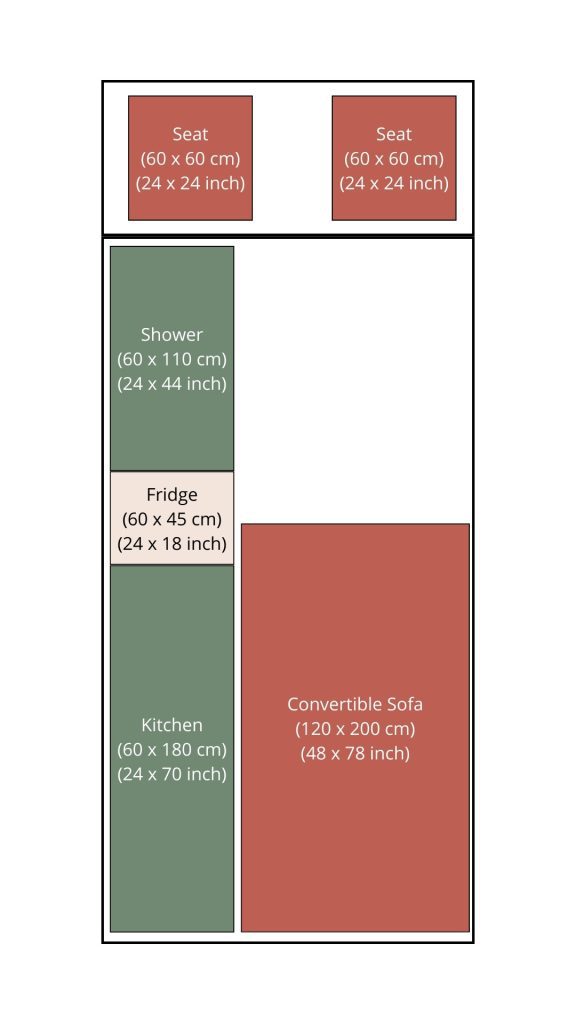
8. The Convertible Couch Setup
This layout is similar to a single-side bed, but with a couch that converts into a bed.
During the day, you have a comfortable place to sit. At night, it turns into your sleeping space – giving you a flexible, multi-use setup.
It also adds a softer, more home-like feel to the van, which many people really enjoy.
The downside is the daily conversion. Turning it into a bed every night can get repetitive, and the sleeping surface is usually not as comfortable as a fixed bed.
Storage can also be more limited, since you’ll likely be keeping things inside the couch.
Still, if flexibility matters more than having a permanent bed, this is a very practical option.
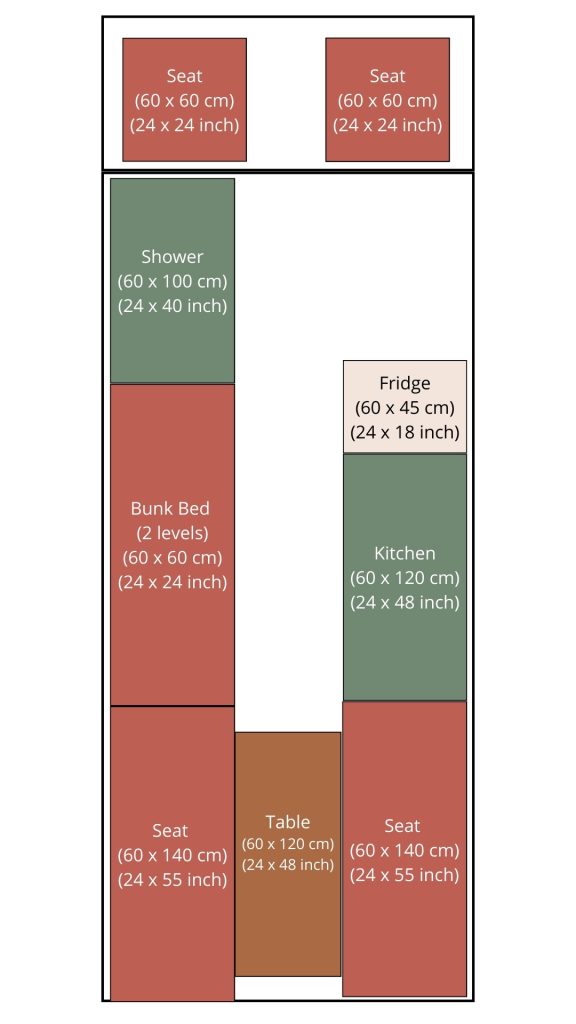
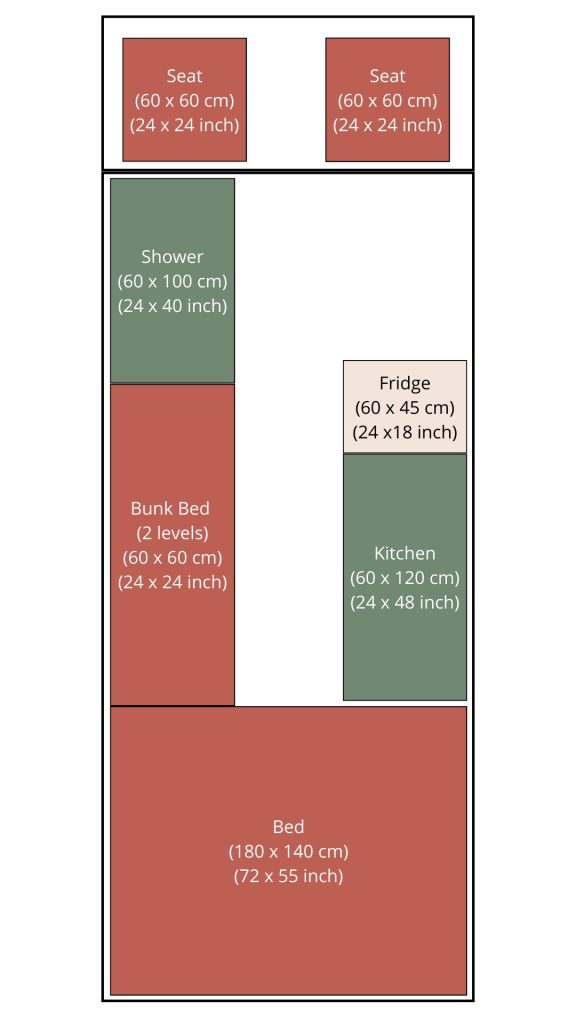
9. The Bunk Bed Setup
If you’re traveling with more people, bunk beds are one of the most efficient layouts.
They make great use of vertical space, allowing you to fit more sleeping areas without sacrificing too much of the floor plan. You also get a bit of separation between sleeping spaces, which can be nice for privacy.
Of course, there are a few things to consider.
Access to the top bunk usually requires a ladder, and you’ll need enough headroom for both levels to feel comfortable.
But overall, this is one of the best ways to add extra sleeping space – especially for families – without relying on a rooftop tent.
10. The U-Shaped Lounge Setup
This layout is built around a U-shaped seating area, usually at the back of the van.
It gives you plenty of seating, making it ideal for relaxing, working, or spending time with others. During the day, it feels open and social. At night, it converts into a large sleeping area.
You also get extra storage under the seats, which is always a plus.
The trade-off is space. This layout takes up a significant part of the van, so you’ll have less room for a garage area or larger gear. And like other convertible setups, you’ll need to transform it into a bed each evening.
Still, if comfort and a cozy living space are your priorities, this setup works really well.

Travel lighter, even before you leave.
start with something simple.
Download The Minimum Plan – Slow Travel:
These Van Layout Ideas Changed How I Think About Van Design
After building my own van and seeing so many different setups, one thing became clear to me:
There’s no such thing as a perfect layout – only the one that fits your lifestyle.
What matters most will be different for everyone.
Comfort. Storage. Workspace. Flexibility.
Once you know your priorities, everything else becomes much easier to decide.
Whether you choose a fixed bed for simplicity or a flexible layout for more space, the most important thing is that your van works for you – not the other way around.
Still planning and feeling a bit overwhelmed?
This guide answers the most common questions people get stuck on when designing their van – layouts, beds, bathrooms, storage, and what really matters long-term.